Grandmother’s Flower Garden Throw Started

Most people would choose to do a Grandmother’s Flower Garden throw in the beautiful colors that flowers typically come in.  I love those colorful throws and blankets,  but I also wanted to coordinate with my neutral living room décor.  So I had to go a different way.

Zip had to get in the picture.

I found Loops and Threads Impeccable yarn on sale, and I liked the neutral colors they had.  They go very well with the colors of my sofa and pillows, and match one of my dogs perfectly! Continue reading “Grandmother’s Flower Garden Throw Started”

Simple Little Hexagons

I got new furniture this year, and with it a new color scheme.  Fun to redecorate and long overdue! That means I need new throws (need them I tell you!).  I have always wanted to make a Grandmothers Flower Garden blanket and so I think one of the new throws will have to be in hexagons.  I haven’t decided what I am going to do, exactly, if it will be in the traditional flower garden  arrangement or some other pattern, other than it will be hexagons.

I don’t plan on starting to make it until the fall, or when I find yarn on sale in colors I want for it, so I have plenty of time to get ideas and try things out.  I couldn’t help but tinker with ideas for a small hexagon, and I wanted it to be smaller than my previous hexagons, just 2 rounds and came up with this one.  It is so simple that I am certain it is not original to me in any way, someone else must have done it this way before, probably many someone’s.  I like how it is textured, which was created by crocheting the second round in between the stitches.

These are pretty small, only two rounds.  These are only 2 3/4 inches across.

LittleHexagons

and here is one a little bigger, one more round… Continue reading “Simple Little Hexagons”

Olga’s Tablecloth Part 2, Revisions

A small change in the pattern, and a little bit of progress.  Despite the motifs being quite large, I still like them and think they will work on my table.  Its bigger, bolder which makes it more modern (I tell myself : )

OlgasTableclothStarted

Not long after I first posted about the tablecloth, I kept fiddling with the pattern (I have been fiddling with this pattern, wanting to make it, for years!).  I wasn’t satisfied with the way the first 2 rounds were coming out for me.  Kept trying different things, but those weren’t any better.  Continue reading “Olga’s Tablecloth Part 2, Revisions”

Olga’s Tablecloth

My grandmother made this small tablecloth years ago.  I inherited it, and I love it.  I wish it was in good condition, it is old and stained, the bright sun today makes it look better than it is, hiding its imperfections. I have been wanting to make a larger one for my dining room, but the thought of all those tiny motifs has kept me from attempting it.

Crochet Tablecloth

A little closer, to give you a better sense of the overall pattern.  I really like it, not too flowery or lacey.

OlgasTablecloth6

Here is a closer look so you can get a peep at the details.  Continue reading “Olga’s Tablecloth”

Granny Hearts

I got the idea to make a granny heart, I am not sure why, but once I did it wouldn’t leave my head.  It has been percolating in there for a while.  I figured I should just do it and get it out of there and unclutter my mind, and here is the result.

Update!  Key to what each symbol means is now included in the diagram.

SmallGrannyHeart

Continue reading “Granny Hearts”

Loopy Ruffle Dishcloth

I ♥ my ceramic chicken!

This basic stitch, from a Bernat pattern (you have to join to view and download the patterns, but it is free to join) I think is one of my favorite stitches for dishcloths.  I have seen it called a Linen stitch, Woven stitch and Moss stitch. Wonderfully functional with a nice texture, fast and easy as pie.  The pattern is fabulous just as it is.

I prefer to work in squares, it gives you an edge that is the same on all sides if you don’t want to do an edging and it naturally comes out square.  So, I worked out how to do the stitch in squares.

They are very nice plain, with a longer loop in one of the corners for a hanging loop, but I decided to add an edging.  I made these with 11 rounds, then the ruffle edging is 2 rounds, one in the stitch and then one of the ruffle.  The ruffle is super easy, ch4, sc.  Ch4, sc, over and over again. For a hanging loop, ch8 for the center loop of one of the corners instead of ch4

A sample size diagram of the in the round pattern, just add how many rounds you would like.

The only bit that is a little different and needs some explanation, is the start of each round.  The ending is as usual, slpst to the top of the sc.  Then I slip stitch into the corner ch3 space, and instead of doing a ch1 to get the height for the sc, I pull up the loop of the slpst a little so I have the proper height, and used that instead of the ch1.  It made the start of the round less obvious without the extra thickness you get with the ch1.  You can do it with the usual ch1 if you prefer.

I used Bernat Handicrafter Cotton in Country Yellow, Country Red, Robins Egg and White, with a size E (3.5mm) hook.  I love the colors, fun, vintage-y and festive!  Maybe I will like washing up dishes more with pretty dishcloths (well, can’t make me like it worse, and maybe I will think crochet thoughts while doing them, which can only be good : )

Off centered granny square

November Morning

I haven’t misplaced my calendar.  I fell in love with these earthy colors (see, I don’t only do bright colors ) and it all reminds me of November in New England.  Frost on the edges of brown leaves as you crunch through them in the woods.  Gray skies that smell a bit of snow.  The greys and dark colors of the bare trees, the rustle of leaves as a squirrel scurries away, scolding me and Zip for intruding.  Snuggling up with a cup of cinnamon coffee or hot chocolate.

Off centered granny square

I started this in the summer, when it was very hot and November weather seemed so far away.  This post has been sitting since then, as whenever I could take photos it was rainy and cloudy.  Today, it was a bit cloudy but I took some photos just the same.

I am not sure how I will arrange these off centered granny squares, but I really like them.  I wanted a quilt-y look with the hombre yarns being the patterned fabric.

These squares were made like the Mitered Granny Square, with a larger center square with a different color border, only 2 ‘half rounds’ that make the miter part, and then two rounds for the final border.

I can smell the leaves just looking at them.

Mitered Granny Square Diagram

UPDATE 1/21/17: I have a new version, Mitered Granny Square 2.1 which is a diagram for a mitered square with ch2 corners and ch1 in between the 3dc clusters that you may want to check out.

To help understand how to do the Mitered Granny Square, here is a diagram.  The diagram only shows the first part of mitering to get you started, it should be easy to extend it to additional rows as needed.  The border is included.

A Better Granny Rectangle

Well, I think it is better : ) As I said before, in my other Granny Rectangle post (I think this one is better), I have always been unsatisfied with how the center of granny rectangles line up in the middle, instead of alternating like it does in the rest of the fabric.  It seems weaker and is not as pleasing to me, I just don’t like it : )  Don’t know why I didn’t do it this way the first time I got the idea, but at least I thought of it now.

A Better Granny Rectangle (or a variation) has been used to make:

Granny Rectangle Dog Mat (has a longer starting center)
Granny Rectangle Throw

Updates

2/9/17: I have a new post A Better Granny Rectangle Revisited. I have made some tweaks to how I do them since I first posted this and thought it deserved a new post. I include another version for doing them with 3dc, ch1.

1/17/17: I have added a Granny Rectangle V2.0 diagram (at the end of this article). This one has ch2 corners and ch1 in between the 3dc’s, to show that version of granny squares.

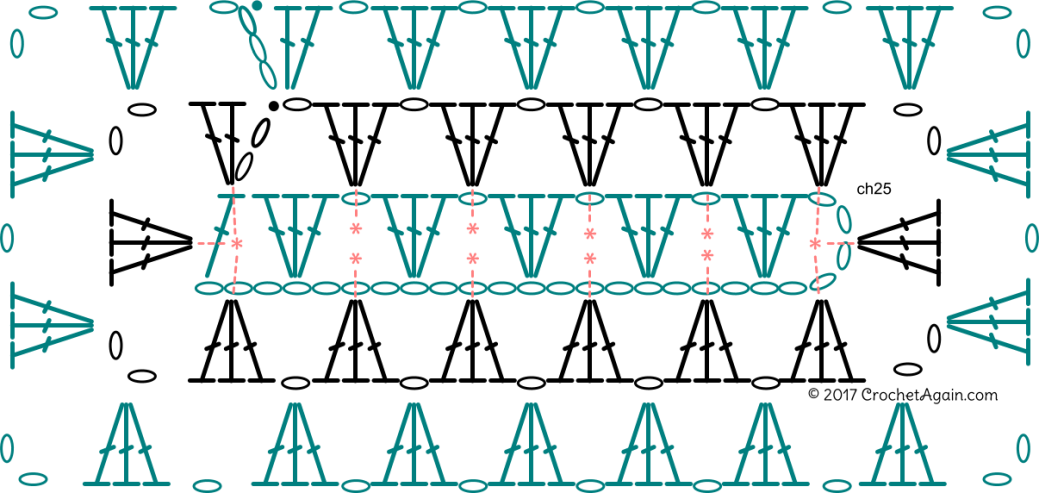
2/25/16: I have added another diagram that shows another round added so you can see how I continue on in the same color, it is near the end of the article.

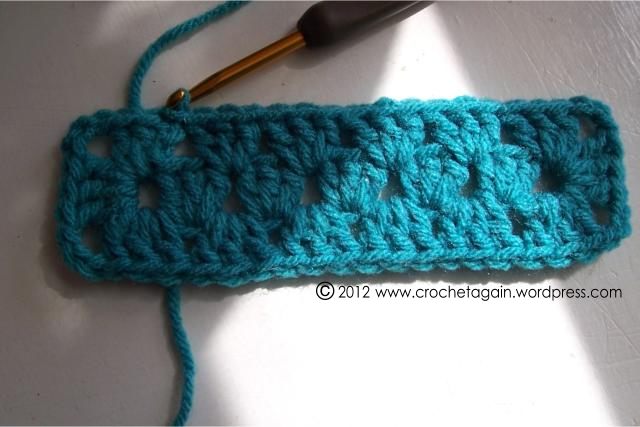
For the size I did in the example:

Ch 22   Ch 21 (corrected 8-24-13)
In the 6th chain from the hook, 3dc.
Skip 2 stitches, 3dc in same stitch.
Continue across, skipping 2 and doing 3dc in the same stitch.  When you reach the last ch, 1dc.  Ch3 (counts as a dc)

Crochet Granny Rectangle 1

In the space on the end created by the dc and foundation ch; 2dc, ch3, 3dc, ch3, 3dc. 2 corners on the end made.

3dc in each space between across…

At the next end; in the ch 5 space 3dc, ch3, 3dc, ch3, 3dc to make the corners on the other end.

Now, go across the other side, making 3dc in each space between…

Slpst into the top of the beginning ch3 and there you have it!

ABetterGrannyRectangle

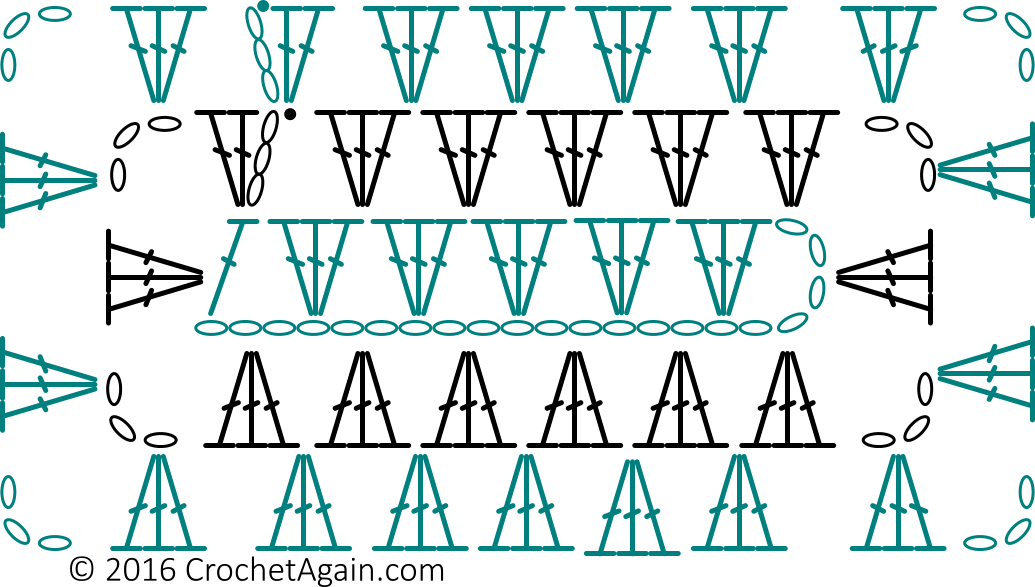
I find diagrams so helpful (pretend you don’t notice that I forgot the ending slpst in the diagram):

Better Granny Rectangle Diagram

and another, to help with the maths of the repeats in case you want a different size…

GrannyRectangleDiagramRepeat

Updated 2/25/16:  Here is a diagram with another round of crochet added. To continue on, you would repeat as in the 2 rounds shown. Update: you can do ch2 in the corners if you find ch3’s are too much. Ch3 works fine for smaller projects, but ch2 would be better for larger items.

BetterGrannyRectangle-Diagram1

Update 1/17/17
This is A Better Granny Rectangle v2.0. The difference is ch2 on the corners and ch1 in between the 3dc’s. For those times you are using this to make a blanket and want to make your grannies with the ch1 between clusters. To change the size, adjust by 4 ch’s.

better-granny-rectangle-diagram-version-2-0

I am feeling that the added space in the starting chain in this 2.0 version is too much, not working as neat and tidy as I would like. Looks like this will be evolving even more, stay tuned!