

A small change in the pattern, and a little bit of progress. Despite the motifs being quite large, I still like them and think they will work on my table. Its bigger, bolder which makes it more modern (I tell myself : )
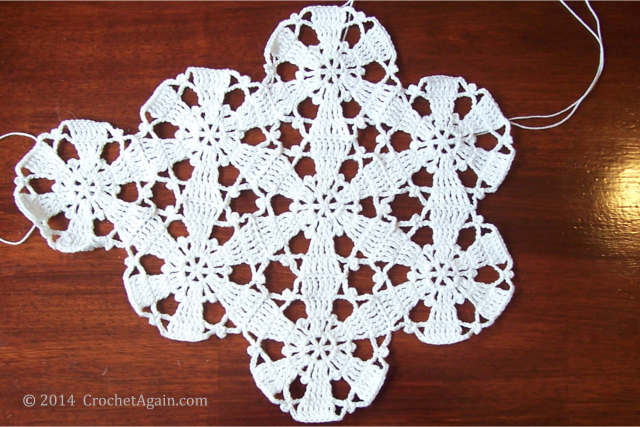
Not long after I first posted about the tablecloth, I kept fiddling with the pattern (I have been fiddling with this pattern, wanting to make it, for years!). I wasn’t satisfied with the way the first 2 rounds were coming out for me. Kept trying different things, but those weren’t any better. Finally, I tried making the 3 trc into the ch space instead of into the dc. That gave me the results I wanted! It neatens up and makes the first round seem sturdier, by covering the chain stitches more completely with 3 stitches instead of just 1. Better! Adding the picots back in on this round makes it look closer to the original, also makes the center area look a bit like a snowflake or flower, I think. Loving it!

Olga’s Tablecloth Revised Pattern
only round 2 is different
using Aunt Lydia’s Fashion 3 in white with a B-1 2.25 mm hook. I am crocheting all the stitches pretty tightly.
Round 1: In a sliding loop, ch5, {dc in loop, ch2} 5x. Slpst to the 3rd of the starting ch 5.
Round 2: Slpst into the next ch 2 sp, ch4, 2 trc in the same sp. {Ch1, dc into top of dc of previous round, ch3, slpst into the uppermost side 2 loops of dc (picot made), ch 1. 3trc in next ch2 sp} 5x. Ch1, dc, picot, ch1 in last dc, slpst to top of beginning ch4.
Round 3: Ch4, trc in same sp. Trc in next stitch, 2trc in next. {Ch7, 2trc in next st, trc in next, 2trc in the next st.} 5x. Ch7, slpst to top of ch4.
Round 4: Ch4, trc in the same sp. Trc in the next 3 sts, 2 trc in the last st of the group. {Ch 4, sc around the ch7 of the previous round. Ch3, slpst into the 2 side loops of the sc to make a picot. Ch4, 2 trc in first st, trc in ea of next 3 sts, 2 trc in last st of the group.} 5x. Ch 4, sc around the ch7 of the previous round. Ch3, slpst into the 2 side loops of the sc to make a picot. Ch 4, slpst to top of beginning ch4. End off.


so very lovely– thank you for sharing this wonderful tutorial.
LikeLiked by 1 person
Absolutely lovely! Love your “puppies”. I have an English Shepherd. Herding dogs are such great fun.
LikeLike
Wow! This is turning out beautifully! Very interesting watching your process on this, thanks for sharing so freely 🙂 one day I may give this a try (oh for more hours in a day!). Have a great week, Helen
LikeLike
Looking really good!!! And, I love your new touch. When you’re ready to start another, I’ll send you thread!! 🙂 🙂 🙂
LikeLike
Ha, ha, ha. Don’t hold your breath, could be 20 years : )
LikeLike
Beautiful! Thank you for sharing the explanation with the diagram!
LikeLike
Thanks a lot for sharing the pattern. I’ve been wondering though what the original edging of the tablecloth is … now when I am almost done with my tablecloth I’m really curious to know.
LikeLike
The original didn’t have any edging added to it. I don’t know if it wasn’t finished, or if it just wasn’t meant to have one. I was thinking that, (if you planned ahead) that it might be nice to add a picot to the center of the petals on the edge that would be the outer ones. That might give it a bit more finished look and go with the picots already there.
LikeLike