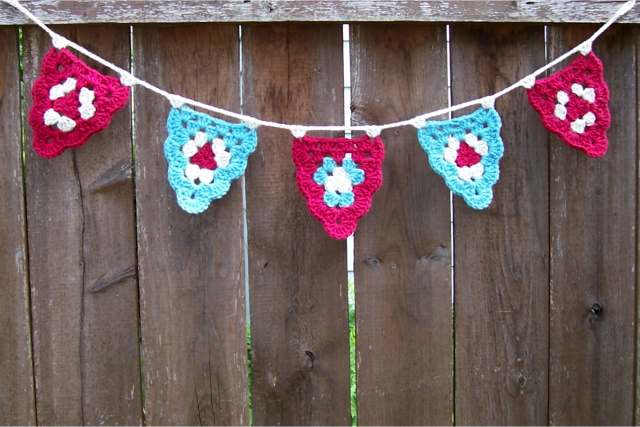
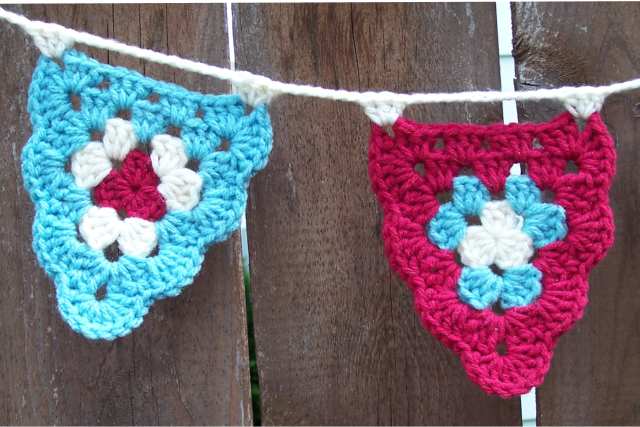
I got it in my head to make some crochet bunting. I tried quite a few different crochet triangles, there is a nice assortment of them on the interwebs. But none of them were just right for me. I wanted them to be a bit taller than wide, and granny was a must. Some scallop edge would be nice too. I think I am happy with these : )
Yes, yes, I do think I like them quite a bit. The colors in the photo aren’t quite right, they are red, white and aqua.
Here are the directions on how I made them, using the red, white and blue one as the example.
I used worsted weight acrylic yarn and a 4.5 mm hook.
Round 1
Start with red, make a magic circle, draw up a loop and ch3 (counts as first dc here and everywhere : )
In the circle, 2dc, ch3
4dc, ch3
4dc, ch3, slpst to top of beginning ch3. End off. (1 group of 3dc, 2 groups of 4dc with 3 ch3 “corners” in between each. The 3dc side of the triangle will be the top)
Round 2
Attach white with a dc or a slpst and ch3 in the corner that is to the right of the group of 3dc. 2dc in same space.
3dc, ch3, 4dc in next corner ch3 space.
4dc, ch3, 4dc in next corner ch3 space.
In the starting ch 3 corner, 4dc, ch3. Slpst to top of beginning stitch or ch3. End off.
Round 3
Attach aqua to the same ch3 corner that you ended with. 2dc in same space.
3dc in the space between the 3dc group of the previous round.
3dc, ch3, 4dc in the next ch3 corner space.
4dc in the next space between.
4dc, ch3, 4dc in the next corner space.
4dc in the next space between.
In the starting ch3 corner, 4dc, ch3. Slpst to beginning. Do not end off.
Round 4
Ch3.
3dc in each of the next 2 spaces between.
In the corner ch3 space, 3dc, ch3, 5dc.
In between the 2nd and 3rd dc of the next 4dc, sc.
5dc in next space between.
Sc in between 2nd and 3rd dc.
5dc in between again.
Sc between 2nd and 3rd again.
In the corner ch3 space, 9dc.
Sc in between the 2nd and 3rd dc.
Carry on like that, 5dc in between and sc between the 2nd and 3rd stitch.
In the beginning corner, 5dc, ch3, 2dc. Slpst to top of starting ch3. End off.
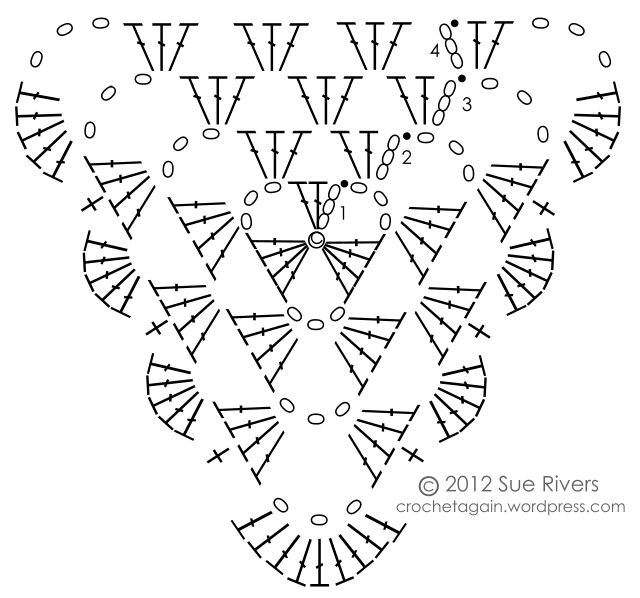
Here is a diagram to help out.
To Join the Triangles
With white, make a slip knot and ch8. Slptst to beginning.
Ch8 again.
3dc in right hand corner ch3 space of your first triangle.
ch12
3dc in the opposite ch3 corner space
ch6
3dc in the corner space of your next triangle.
ch12
3dc in opposite corner.
End with ch16, slpst in 8th ch from hook, end off.
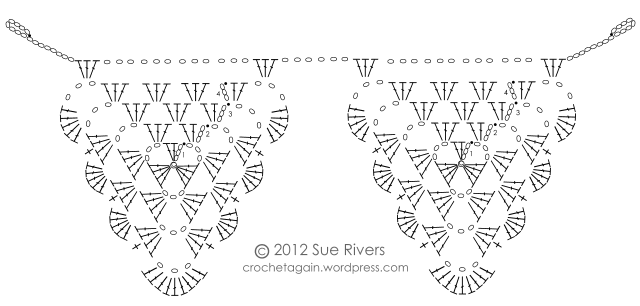
Another diagram to help out, hope it is big enough to see clearly….
Love to hear about and see any that you make!


This is great! I’ve been wanting to try making bunting, I really like the design on this.
LikeLike
Thank you for sharing your lovely bunting pattern. And the photo of your dog hair contributor. What a beauty. I love border collies. Grew up with one and, as far as I’m concerned, they are one of the best breeds out there! Yeah for you!
LikeLike
This is beautiful, I think the nicest one I have seen, I can’t wait to have a go thank you.
LikeLike
Thanks so much for the nice comments! And yes, Border Collies are the best, I am not biased in the least : )
LikeLike
What a great idea and lovely pattern! Will be posting on my blog as soon as I make this.
LikeLike
thanks for this lovely pattern … i am on a mission to prove to a friend that bunting is NOT the flags you find on a used car sales lot! i am getting close, but this one will put her over the edge and she will have to agree with me … i am looking forward to that victory!
LikeLike
I love your bunting and I wrote about it on my blog! Thank you for the diagram and a great pattern!
http://www.mymerrymessylife.com/2012/09/fall-crochet-mantel-bunting.html
LikeLike
I love them, I can smell pumpkins and candy corn! And, I crochet while watching “So You Think You Can Dance” too.
You have a wonderful blog, I think I will be making that Easy Million Dollar Chocolate Cake.
LikeLike
My sister’s birthday is around Thanksgiving every year and she told me recently how disappointed she was in the lack of Turkey Day Decor there was, so last night I decided to make one of these in fall colors to put on her fire place. So quick and pretty! Thanks for sharing!!!
LikeLike
I really love your bunting and really wanted to do something with it. So I made 8 of them in different colors wit lettering on them and with those I made a beautiful bunting garland for my daughters 3th birthday. Got lots of compliments! Love your blog as well, thanks for all these beautiful things!
LikeLike
Thanks for the pattern, turned out great! Don’t know how to paste pic or I would.
LikeLike
Thank you for your lovely pattern.I made a long string of red cream and green Christmassy bunting today and added little bells to the bottom of each one. It turned out really well.thanks again and Happy Christmas.
LikeLike
Rd 2.. I don’t understand. .after the 2dc then is the 3dc in the same stich? I don’t know when to move forward
LikeLike
The pattern says the 3dc, ch3, 4dc are in the next ch3 corner space. The diagrams are helpful to clarify things.
LikeLike
Thanks for sharing! This is exactly what i need for my craft/bedroom. can’t wait to get started.
LikeLike