

Over the years I have made some tweaks and changes when I use A Better Granny Rectangle. I thought it was time to share those changes in a new post. There are 2 versions included here.
A Better Granny Rectangle 1.2
This has some minor changes from the original. There is a ch5 space at both ends (sometimes I do a ch4 instead), and ch2 instead of ch3 for the corners.
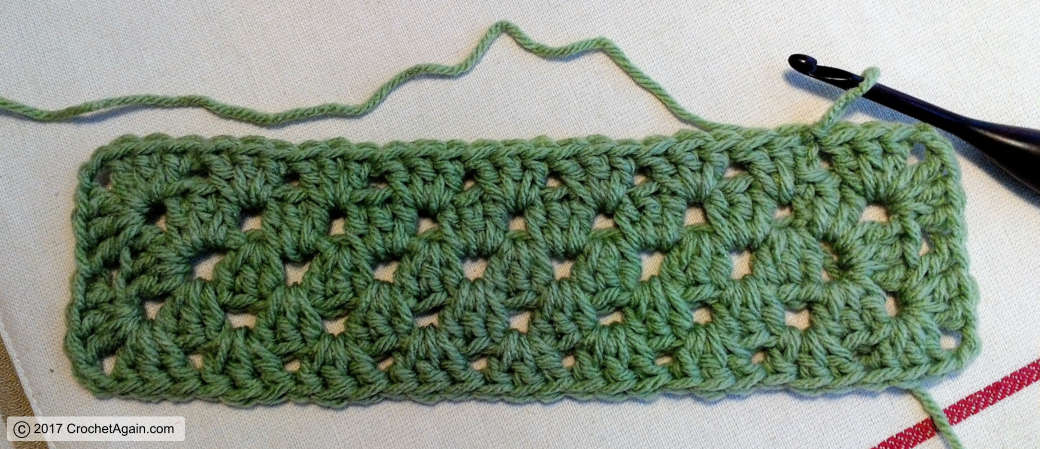
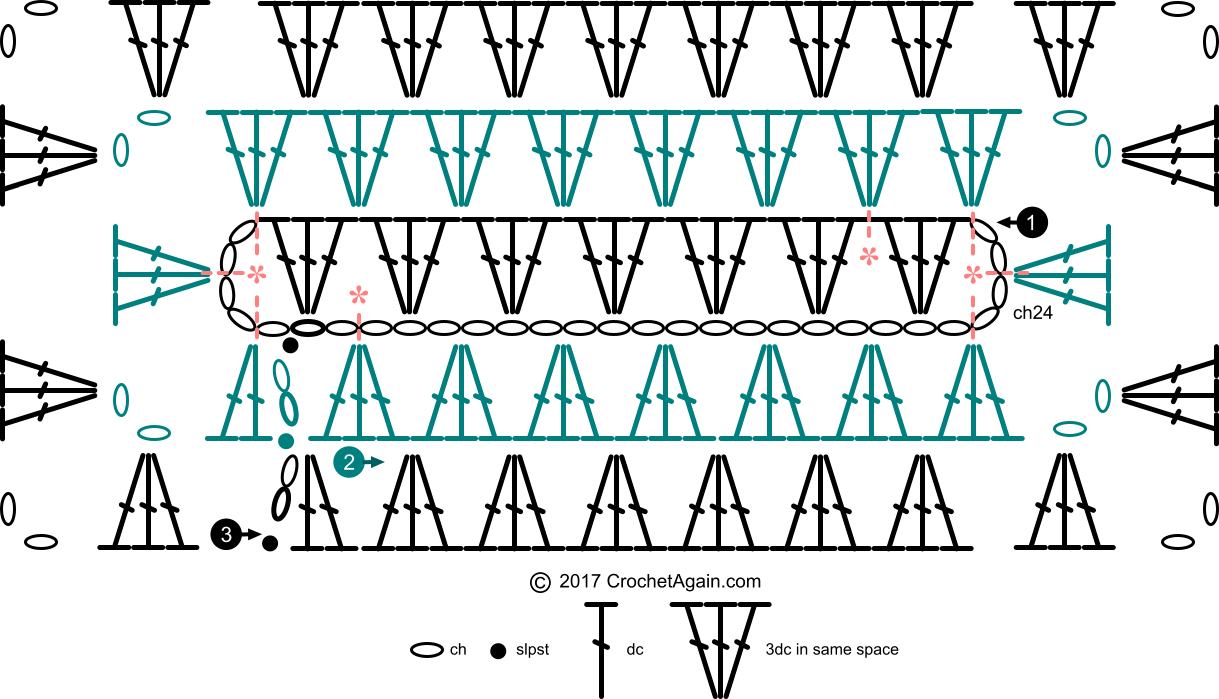
Diagram of A Better Granny Rectangle V1.2
And here is how…
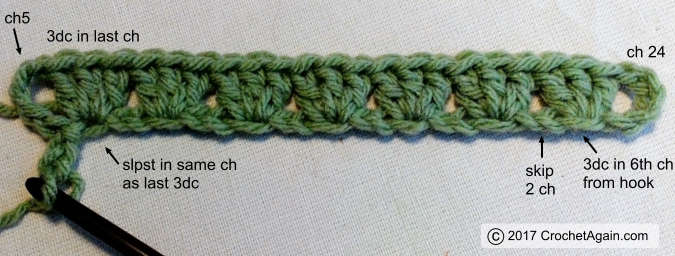
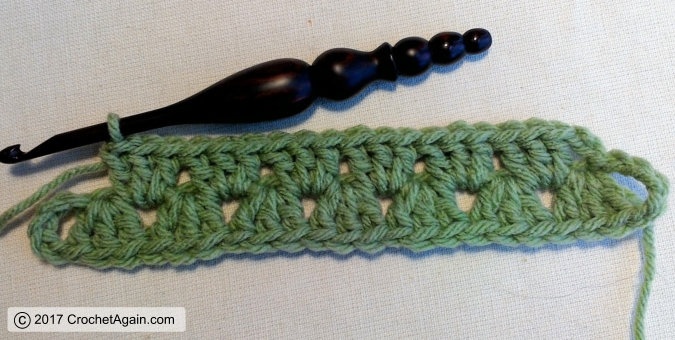
Ch24 (you can adjust the size in multiples of 3)
3dc in the 6th ch from the hook
Skip 2 ch, 3dc in the next. Repeat to the end, ending with 3dc in the last ch
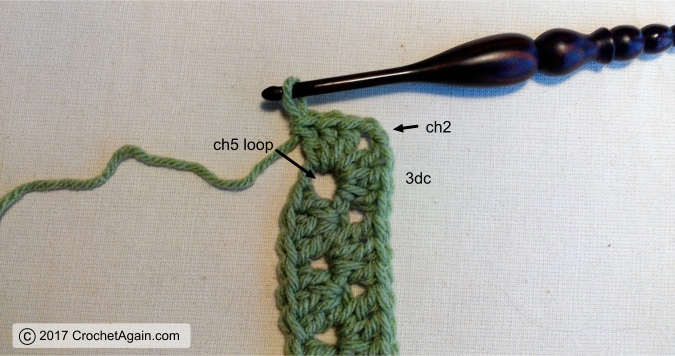
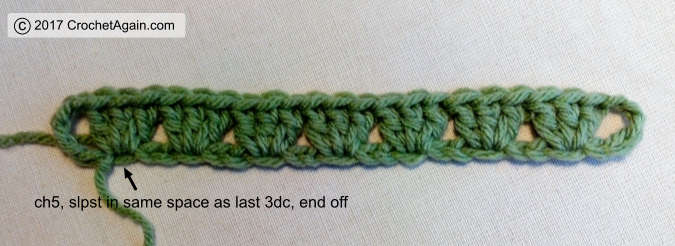
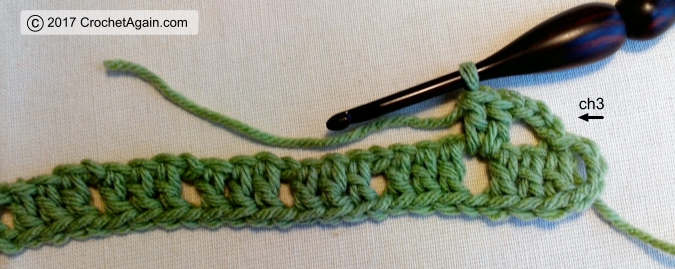
Ch5
Slpst in the same ch as the last 3dc
Rotate the work
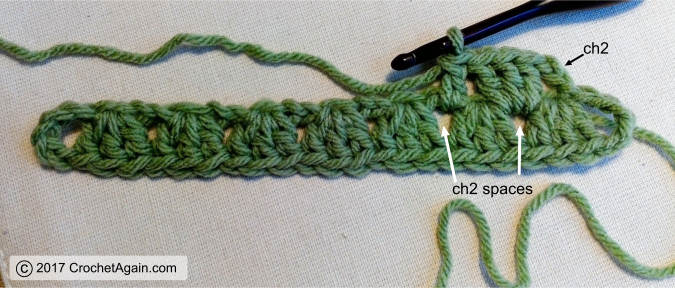
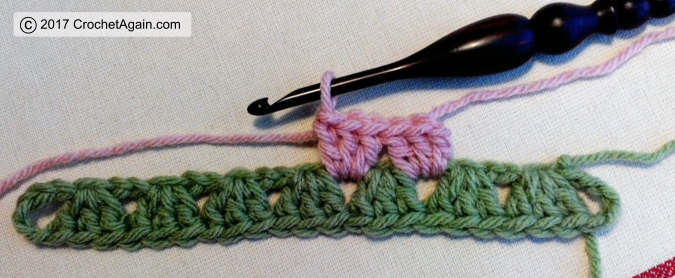
Ch2 (this counts as the 1st stitch)
3dc in the next ch2 sp
3dc in each ch2 sp across
3dc in each ch2 space across
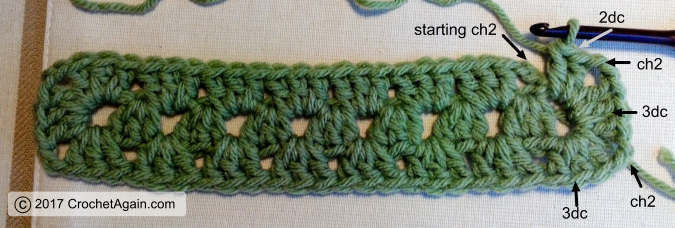
Now to make corners for the rectangle
in the ch5 loop on the end, 3dc, ch2, 3dc, ch2, 3dc
Once the 2 corners are made in the ch5 loop you will be working along the other side…
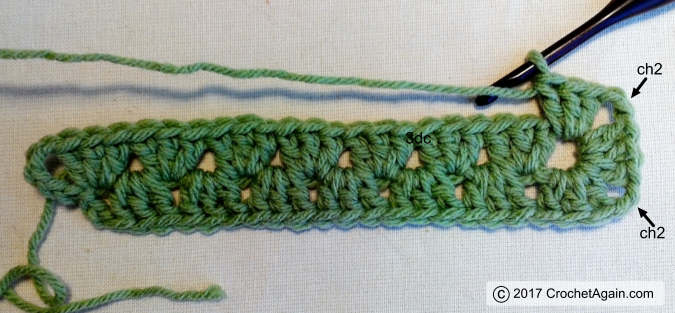
And go across with 3dc in the spaces between each group of 3dc of the previous round.
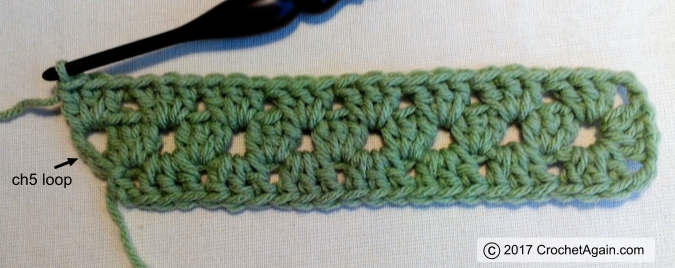
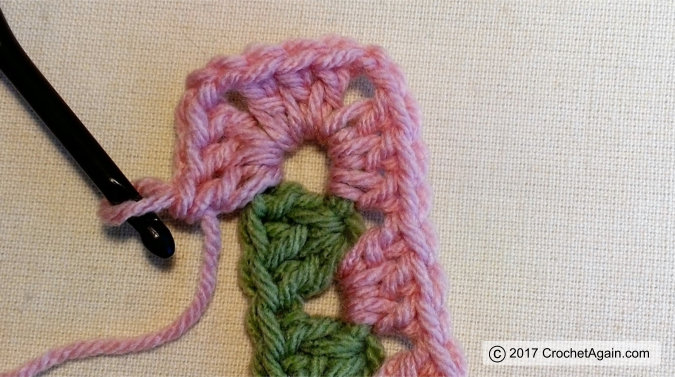
Now you are at the last ch5 loop ready to make more corners.
In the ch5 loop – 3dc, ch2, 3dc, ch2, 2dc
Slpst to the top ch of the ch2 that started this round.
Ch2 to begin the next round (this counts as the 1st stitch).

2dc in the space right next to the ch2

3dc in between the 3dc’s of the previous round.
3dc, ch2, 3dc in each ch2 corner space
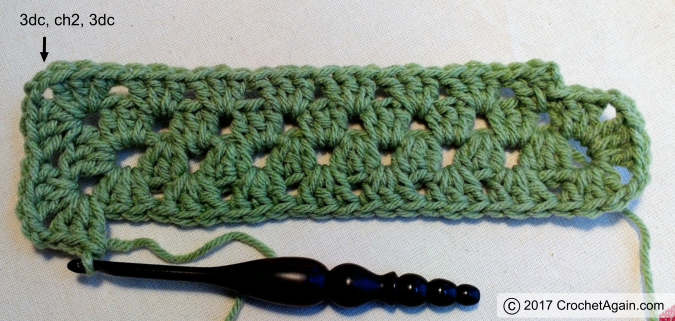
Continue around with 3dc in between each 3dc of the previous round
3dc, ch2, 3dc in each corner ch2 space
Finish the last corner and slpst to the top ch of the beginning ch2
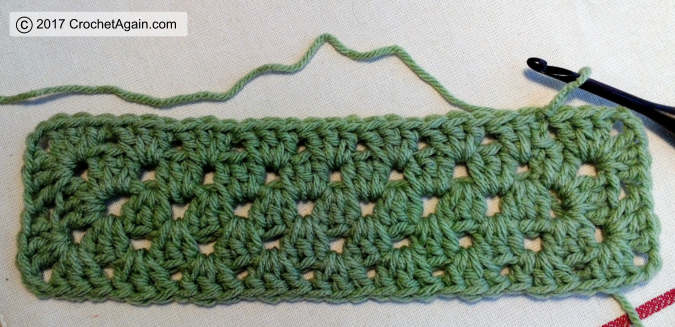
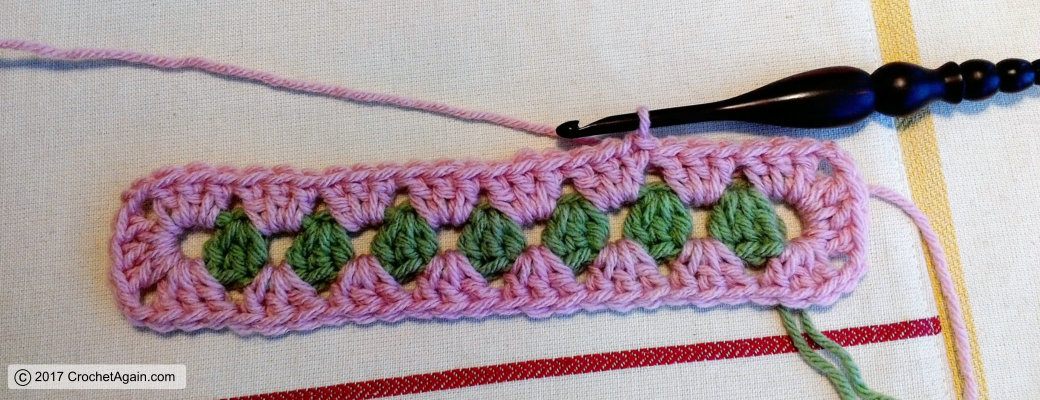
And there it is!
If you want to continue in the same color you would repeat the last 2 rounds.
Different Colors on Rounds
If you want, you can do each round in a different color, or change colors whenever you want. Simply end off at the end of a round and start the next round by attaching a new color.
Begin the same ending with ch5, slpst in the same ch as the last 3dc, and then end off.
Attach your new color in the space between any group of 3dc. You can slpst and ch2, or you can use a standing stitch as I did here.
Continue around making corners in the ch5 loops as above.
Slpst to the top of the first stitch and you are done with that round. End off to start another color.
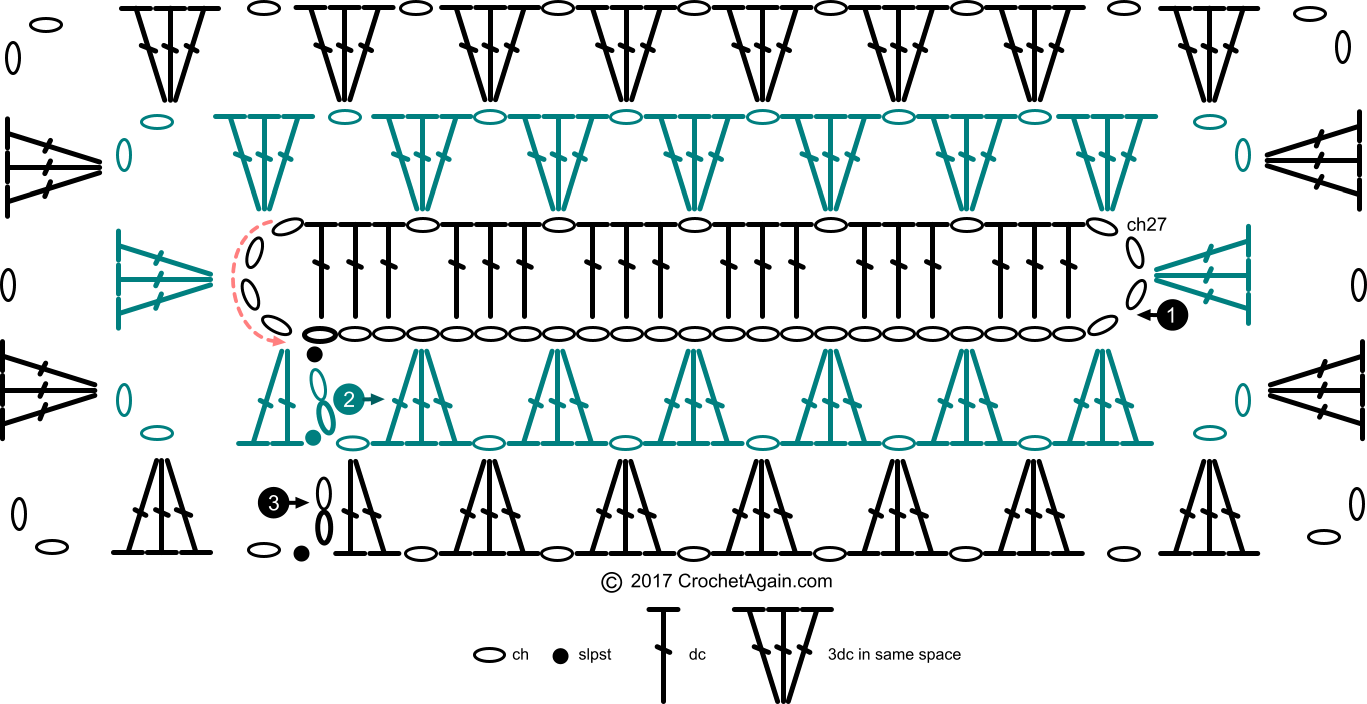
A Better Granny Rectangle Version 3.1
Another version, this one is different.
I wanted one for when I want to make my rectangles the 3dc, ch1 way. Having 3 ch’s between each 3dc clusters in the foundation chain seemed a bit too roomy, so I did this instead.
I haven’t made anything with this yet, so I don’t know how it will hold up with larger items, but it seems to be a nice and neat option for starting rectangles.
The beginning is different, but once that is done the only difference is doing ch1 between the 3dc’s, so this is very brief.
This is easy to start, ch27
Dc in the 5th ch from the hook (I did a ch4 loop on the ends instead of ch5, change it if you want)
Dc in the next 2 ch’s, ch1
Skip a ch, dc in the next 3 ch’s, ch1
Continue like that, you will end with a dc in each of the last 3 ch’s.
Ch4, slpst in the same ch as the last dc

For the next round, you do ch3 (counts as the first stitch, and ch1)
3dc in each ch1 space
The corners are as above – in the ch 4 loop, 3dc, ch2, 3dc, ch2, 3dc
Continue along the other side
In the last loop it is 3dc, ch2, 3dc, ch2, 2dc
Slpst in the 2nd ch of the starting ch3
The 3rd round is done the same as the version above, except you work in the ch1 spaces
Ch3 (counts as the first stitch), 2dc in the ch1 sp.
Continue around as before
If working in the same color, you repeat rounds 2 & 3. If changing colors you end off and attach a new color as above.
Here is this version done with a different color for the 2nd round. You can see how it is worked into the ch1 spaces on either side.

Diagram of A Better Granny Rectangle V3.1
And another version

…

I really like your ideas. There very nice and not boring
LikeLike
i just love these 2 different ways to crochet a better granny rectangle. i am trying to figure out how to crochet a flower afghan block or a small mandala that would be the center of an afghan. i can find lots of square blocks but i really want rectangular. i am trying to see if there is a way to go from square to rectangle. not sue I’m making much sense. i could use any ideas or suggestions you could offer. I’m thinking one of your versions might help me figure something out. have a great day. 🙂
LikeLiked by 1 person
I’m wanting to use the Version 3.1 to make a temperature journal blanket for my baby — with the centre row 21″ long — how long is your centre based on ch27 start?
Thanks
LikeLike
sorry, neglected to measure it!
LikeLike
Thanks for the great pattern!
LikeLiked by 1 person
Thank you that has been so helpful and easy to follow. The diagrams are so easy to understand.
LikeLike
I just wanted to say thank you. The instructions are really easy to follow and I’ve already made a start on the blanket I want to make for my nephew for Christmas.
LikeLiked by 2 people
I have now made 17 of these blankets for charity – it is such a great pattern. I am thinking of making a wide scarf next – could you give me some idea of how long to make my starting chain for a scarf say 120 x 30 cm?
LikeLike
I haven’t made a granny scarf yet (it is on my mental list of things to make!). I would probably make a starting chain about as long as felt I wanted the scarf plus a little extra. Then do the first row in the stitch and when it reached the length I liked I would just undo the extra chains. Continue on. I would keep in mind that the scarf would get longer as it gets wider when I decided on the beginning length. Ok, now I really want to make a scarf LOL!
LikeLike
I have now made my first scarf! I had a starting chain of 34 motifs which was 74cm long, and ended up with a scarf which is 110 x 36cm after 18 rounds. The same starting chain would have given a 96 x 28cm scarf if I had stopped after 14 rounds.
LikeLike
Wonderful! Would love to see it!
LikeLike
I’ll blog it soon and send you a link! In the mean time you can see the granny rectangle blankets here: https://iamsimplyhooked.wordpress.com/category/baby-blankets/. Thanks for the inspiration….
LikeLike
Very nice!
LikeLike
I have blogged the scarf so you can see the picture now:
https://iamsimplyhooked.wordpress.com/2017/04/28/granny-rectangle-scarf/
LikeLike
I am definitely putting a granny scarf on my to do soon list!
LikeLiked by 1 person
Thank you thank you thank you! I much prefer this starting method, and you’ve written it up so clearly. Started my blanket last night.
LikeLike
Thank you for sharing this pattern…How many chains would it take to start a 48″x 60″ blanket? Thank you.
LikeLike
I haven’t worked out the starting ch for different sized blankets. You would want your beginning (the first row as in the first photo) to measure about 12″. That should give you a rectangle that is about 12″ longer than wide, or at least it seems to work out that way for me.
LikeLike
I used the 3.1 pattern for my first ever rectangular granny patterned anything. I made a shawl for a friend while on holidays this summer and it turned out beautifully. Making another asap. Thanks for the instructions and the very helpful diagram.
LikeLike
I have made regular Granny Square afghans, but do like the rectangular look too. I have a LOT of acrylic yarn in a tangled mess from my mom, so as I untangle I can make blocks. Thank you so much for a fun looking pattern.
LikeLike
This is exactly what I need for my Grandma’s Christmas gift! Thanks!
LikeLike
Is there a program you use for creating the diagrams?
LikeLike
Is there a way to print this where we won’t end up with 20 pages, i.e., just the instructions? No comments, no pictures, etc. Tks.
LikeLike
I don’t have a printable pdf. You could copy the text you want and paste it into a document.
LikeLike
Okay.
LikeLike
Copy the website address, go to http://www.printfriendly.com, paste it in the box, and hit the button. Voila, printable pattern! Couldn’t get any easier.
LikeLiked by 1 person
Thanks so much for sharing that site; I’ll save a fortune in ink! I’ll be putting it in every crochet/yarn bag I have!!!
LikeLike
Love it. Made one when I was younger, but no longer had pattern. Thank you very much.
LikeLike
I thank you so very much! I was looking for a way to make a nice rug in a rectangular shape that I could use mandala like colors in and you’ve provided a way to do that in a very easy to understand way. I’m going to be able to use this in many ways. I’m so excited!
LikeLiked by 1 person
AHHHH!!!! THANK YOU! Your pattern looks more solid than any other rectangle pattern. I’ve tried other patterns before but it always felt to flimsy to me (and I have a tight tension). I will be eagerly trying your pattern (one my arm is out of the cast).
LikeLiked by 1 person
This will be great for fingerless gloves- just do the rectangle until it’s big enough for your hands, then join the left and right sides, leaving a hole for the thumb! Going to try it now!
LikeLiked by 1 person
I have been using your V3.1 and so far used a whole skein of Caron One Pound. The yard is a medium weight and recommends a “H” hook, but I have been using a “I” hook for my project. While I really like the revisions you have made, I am having some issues that are not major, but annoy me. My sides have developed waves and my corners are leaning to the left and seem to be longer than the sides. I don’t know if you have run into this, or if I am being too picky, but I was hoping that maybe you had a solution or suggestion that might help.
LikeLike
When I did a larger project, I found with the 3.1 it got wavy for me too. I think the ch1 between adds too much. I only use that version if I have a need for it, like if I want to join rectangles together with join as you go. For larger rectangles I stick with the 1.2 version.
LikeLike
Thanks for the quick reply. I was thinking that might be the solution. Now my husband can laugh as he watches me unravel yet another project. Was also thinking that doing 2dc-ch2-2dc in the corners might help too. As always it will be trial and error, it’s just that I hate taking things apart.
LikeLike
Love this pattern & this version makes a much nicer looking afghan. Thanks for the pattern.
LikeLike
Hi, I have just started crocheting after more than 3 decades. There’s many tutorials that can be viewed and test it, compared to those years, crochet books are the only reference available when you are at the other part of the world.
After browsing, I love to try your tutorial. Can’t wait to begin doing it. Thanks and appreciate your sharing.
LikeLiked by 1 person
I absolutely love this pattern. I really love the look of the rectangles but I’m having trouble connecting them. What join did you use? And any tips would be helpful. Thank you so much for the post.
LikeLike
I haven’t (yet) made anything with rectangles that I connected. You can use any method you like. I like the join as you go (search this site) for many things, but it depends on the look you want. There are some links to other kinds of joins under “interesting articles” in the right hand column.
LikeLike
Loving the Granny Rectangle, this is new to me. I have crocheted the Granny Square before. My question is do I “turn” my work after I connect the row with a slip stitch? Turning give the square “texture”, if that makes sense. Not turning let’s you have a wrong side and right side. Thanks
LikeLike
I do the same as granny squares, no turning. But it is your crochet work, so you could try that if you want.
LikeLike
Thanks a lot for this great solution. I wanted to crochet a shawl with a multicolor yarn in rows but I didn’t like my own attempts of a rectangle. But when I’ve seen your pattern, I can’t wait to start 🙂
LikeLike
I’ve forgotten: Your first version is great but your second version is perfect!
LikeLike
Best rectangle pattern I’ve found! Thank you so so so so much!
LikeLike
I love this pattern! You did an excellent job with the directions and the pics. My afghan is about a third of the way through and I really enjoy making things pattern. Thanks so much!
LikeLike
Please let me know how y put these rectangles together to make a bead quilt
LikeLike
I haven’t made a quilt out of smaller rectangles. I have made some throws by making one big rectangle.
LikeLike
This is the perfect pattern. Just what I was looking for. I’m crocheting needed items for my local animal hospital. The ‘reviisited’ pattern shows how to expand and change colors. I, personally, use a different method for color change. It works just as well. One thing I wish to note, even though solids and ombres are listed as 4ply worsted weight, their tensions may differ. Hook size may have to be adjusted to maintain conformity in the pattern. (EG: Solids ‘G’ hook – Ombres ‘H’ hook). I hope this suggestion will be helpful to anyone using pattern Thank You again for sharing this pattern. HAPPY CRCHETING EVERYBODY!!! GAIL
LikeLike
What size needle did you use?
LikeLike
It depends on what yarn I am using. With this yarn, I usually use an H hook.
LikeLike
Your patterns are wonderful so easy to understand. Here’s a chalked for you is it possible to crochet a marketing design in he same manner rather than in rows? I can see it in my mind but it won’t come out my fingers. Lol.
LikeLike
You can do many things with crochet. Not sure what you mean by “marketing design”?
LikeLike
Thank you for this great explanation. I just stumbled on it this week and I really appreciate all the different thoughts you had as you experimented. I’ve began a few tester starts with your different ideas and I think I’m gonna go with a chain 24, skip 3, HDC in every stitch. Then I will do 3Dc’s around without chains between. I like the tighter look for the beginning. Thank you again for helping me get started!
LikeLiked by 1 person
Love the pattern and I want to download it so I can print to work from but it is just not happening. Please could you send it to me. Appreciate your help.
Warm wishes and a million thanks,
YVONNE DPENHA
LikeLike
Thank you for the patterns. Want to make a rectangle shawl, 60” long maybe 18-20” wide. I must have missed something. I don’t understand how long to make the starting chain.
Can you help me?
Thank you.
LikeLike
I only have widths worked out for projects I have made. If you check out the links in the post, there should be one that gives a general guideline for starting chains.
LikeLike
Do you block your Afghans and how do you do it since the finish would be so large? I sed to just put in the washer on gentle and then dryer. It always comes out soft and even all the way a round but is there a better way. I did 7” granny squares and joined together to form a rectangle then put a ten row border all the way a round. I did steam block the squares and loved how they came out. The border became an issue because of the size but did just a wt spray block. It did turn out really nice but concern about how it will wash up in the future…..that scares me the most. Not sure what to do about since I did two different types of blocking. Any suggestions about to expect or do would be greatly appreciated.
LikeLike
Better try real hard to keep that afghan clean!
LikeLike
I don’t block mine. Washing depends on the yarns, gentle wash and low dryer usually.
LikeLike
Thank you so much for this! This is always my go-to for baby blankets, which I make by just continuing around and round with a variegated skein or two (depending on size)!
LikeLike