
I have made all my Log Cabin squares and am now starting to join them together so I decided to do a quick tutorial on my favorite way of joining granny squares (of course, it took much more time than I had hoped!). I am hoping to be clear and keep it simple, as it really isn’t that complicated, but it is often easy to make things sound more complicated than they are.
My squares are going to be bordered with two rounds of gray, and I held off on that until I was ready to start joining, so the first thing to do is complete the border on the first square in order to have one to join to. The rest I will join as I am doing the second (last) round of the gray border. (The photos show more than that joined together already). To help make it easier to see, I am doing the last round on this demonstration one in pink instead of gray.
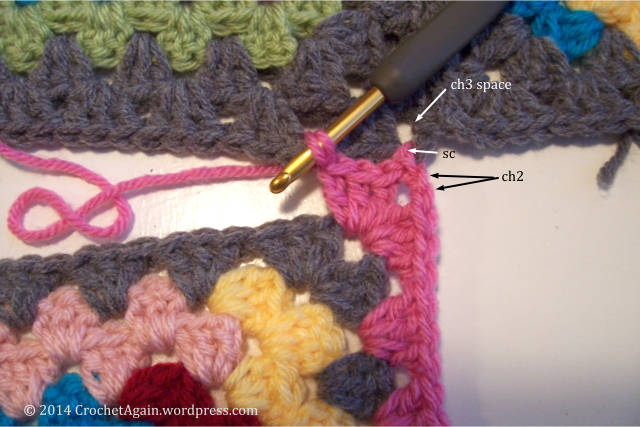
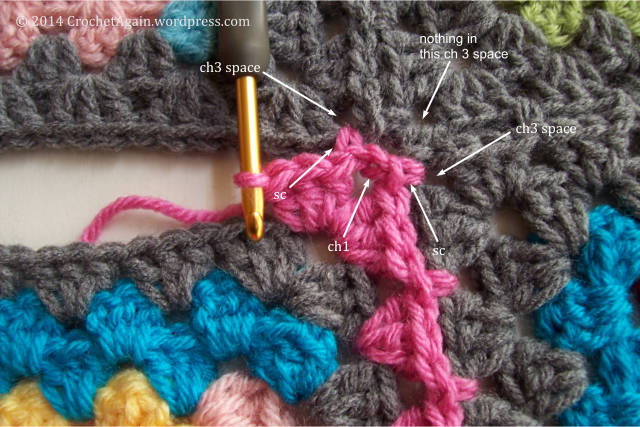
I begin the joining in the corner, so crochet your last round up to the corner ch3 space, 3dc in the ch3 space as usual and then ch2 (I normally ch3 for each corner, this is one less ch, my attaching stitch will count as the 3rd).

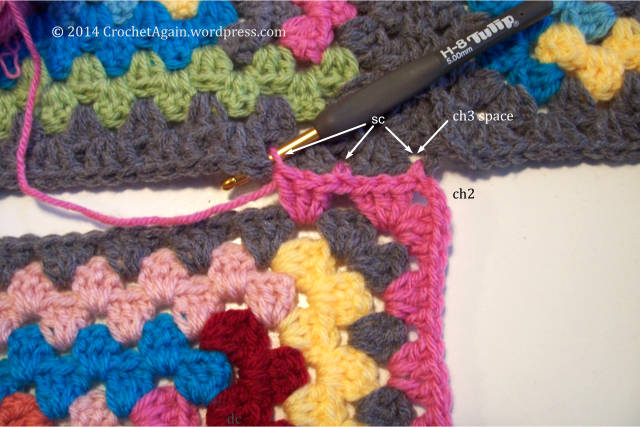
Now you are going to sc into the ch3 corner space of the square you are joining to. Make sure you have the wrong sides together (in other words, the right sides are outward and the wrong sides are inward). Once you have attached to the other square with the sc, continue on crocheting 3dc in the corner of the square you are crocheting the border of.
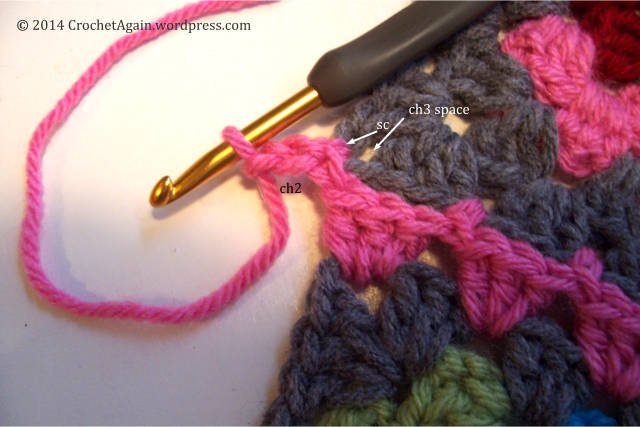
When the corner is finished, sc in between the next 3dc cluster of the square you are joining to.
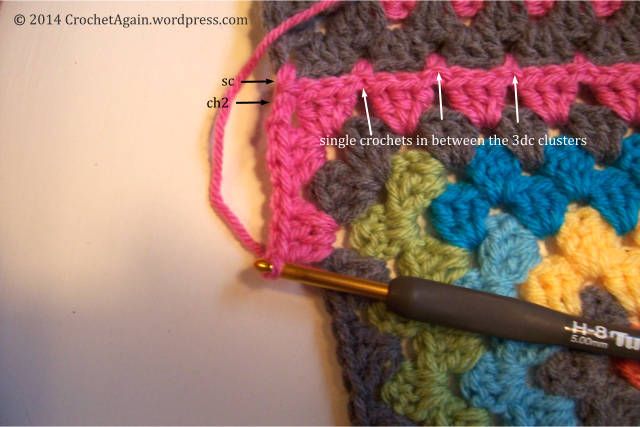
The 3dc clusters are going to line up against each other, the attaching single crochet’s go in between the clusters. Continue along the edge, crocheting the final round and attaching to the other square with a sc after each 3dc cluster. Watch carefully, it is easy to skip one as you are going along.
When you reach the other corner you are going to do it slightly differently then the first corner. This time you will make the attaching sc and then ch2.
Finish the corner with remaining 3dc and then continue on finishing the final round of your square as usual….
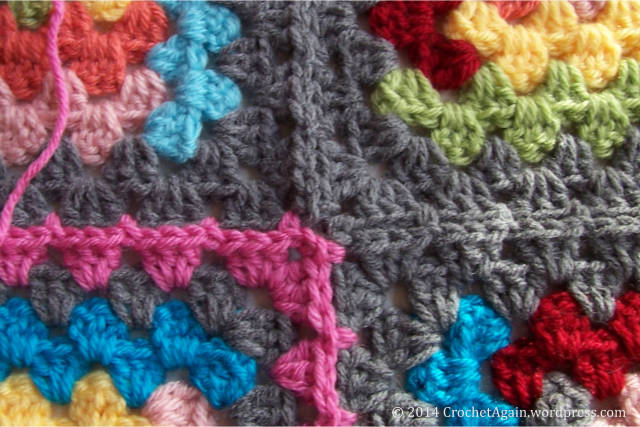
Attach more squares into a row the same way, and attach the first square of the second row. Now you will see that the squares are going to need to be attached on two sides. Attach the first side as above. The corner where all the squares meet will be done a little differently.
When you reach the corner where all the squares meet, make the 3dc in the corner as usual, then sc into the ch3 corner space of the square you have been attaching to (no ch’s first). Ch1. Sc into the square that you will be attaching to next.
The diagonal square, the one that is already attached to two other squares you can just ignore, you aren’t going to do anything to that one.
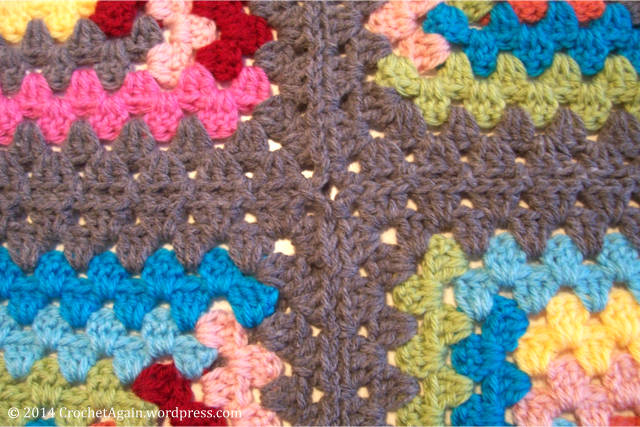
This next photo shows how it looks when in gray, if you look closely you can see where the sc’s are and the nice neat center meeting point. I like using sc instead of a slpst, my slpst’s tend to be a little tighter, the sc just seems to work better for me.
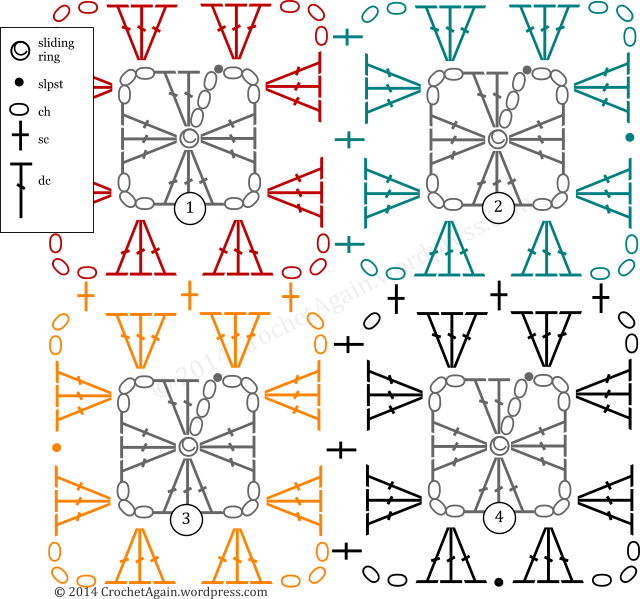
I always find diagrams helpful…

Excellent tutorial. Thank you!
LikeLike
Very clear, thank you!
LikeLike
Thanks I’ve pinned this one
LikeLike
This is so well explained with excellent photos in contrasting colours and the results are beautifully neat. Thank you for explaining this so clearly!
LikeLike
Very clear thank you so much !!!
Brigitte
LikeLike
Beautifully done! At last I know how to join my squares!
Thanks a lot.
LikeLike
This is a brilliant tutorial – just bookmarked it! I made a load of granny squares a year ago to make into a blanket but as of yet I haven’t done anything with them. I think this will inspire me to get joining them together! Thank you! x
LikeLike
ThankYou. You instructions are very good. I had made an afghan years ago and used this method. But I no longer have the book with the instructions and had forgot how to do it. I had been looking and googling for the past week. And just like an answer-here you are! Thanks again.
LikeLike
Wonderful tut! I have only one question, and I apologize if I confuse you. Do I join my squares in 4-block segments or can I join them in strips? Thanks!
LikeLike
I tend to like to do 4 (as shown), then start making the 4 into a 2 row strip! Then I add another row below. But, I don’t think it matters. Do what seems to work out best for planning or ease of handling.
LikeLike
I would be interested to hear the answer to this question.
LikeLike
The answer was in the comment directly above yours.
LikeLike
thank you for showing me how to sew the blocks together——very lovely pattern—–
LikeLike
Hi do you have any blanket patterns that aren’t granny squares? I’ve been asked to crochet 17 blankets but can’t find nice patterns. You’ve got me onto the idea of granny squares again though as I’d totally turned against them but I like the mitred square and log cabin.
I tried subscribing to this but it keeps jumping to address bar for some reason.
Do you know of any good free pattern sites?
LikeLike
Ravelry is a great place to start, you can search for specific kinds of patterns there and they have lots (free and paid ones). You have to sign up to see it all, but it is free to join.
In my sidebar (click on the orange bar on the left and it will slide out, you will need to scroll up to the top of the page to see it) I have a list of some free pattern sites.
LikeLike
Thank you, thank you, thank you!!! Finally I understand this method!
LikeLike
So glad it helped!
LikeLike
I have seen several other wesites try to explain this, and it never made any sense to me. Until now. Between the pictures and the easy to fallow directions I will finally be able to do something that I have spent years trying and failing to figure out. You just made my projects much easier. Thank you so much. I can’t wait to try this out my next blanket!
LikeLike
Esta muy bien fotografiado y explicada.
Gracias
Carmen
LikeLike
Great tutorial. Best I have seen so far. Many thanks
LikeLiked by 1 person
Picturing this left handed is making my head hurt 😉
LikeLike
I’m using this tutorial on your mitered square blanket. Thank you for this, it’s very clear. I especially appreciate the charts, they seem to make more sense to me than words generally do. By the way, what program do you use to make up your charts? I sometimes like to chart out written patterns for myself to make it easier to follow and would love a program to use instead of drawing them all out. TIA.
LikeLike
Hello! How would I adjust this to a 2 chain, 2 corner chain granny square? I make a 4 round granny, with 2 chains in the corner between the dc shells, chain 2, 3 dc, chain 2, and then the next corner. Thanks for any help!
LikeLike
Sometimes I do ch2 corners with my grannies, that is an easy adjustment, you would do it the same as shown, but you won’t have the extra ch in the center of the corner joins, if that makes sense. For the joining along the edge, I think I might try doing 2 sc in the other squares ch2 space, instead of 1 and see how that looks. That would give an even join, but a bit more visible I think.
LikeLike
Thank you! I will try this and see how it goes….
LikeLike
Thank you so much!!! So far it is working great!
LikeLiked by 1 person
Such a great pattern, thank you for sharing! One question though….are you blocking your squares as you go, or do you just block the whole blanket when you’re done? I’m trying to find the most efficient way since I’d like to finish this blanket before Christmas. Thanks!
LikeLike
I think the whole blanket is best, as you would have to block the squares before the joining round, which means that last round plus any final whole blanket border would not have been blocked.
LikeLike
I have my squares all joined and want to put several more rows of granny stitch around the whole thing. What would you do where the corners are joined. Would you put a cluster in each side or one stitch of a cluster in one side and two stitched in the other side.
LikeLike
How I go across where the corners are joined…1 stitch on the first side, then double crochet 2 together (with the 1st leg of it in the corner space of the first square, the 2nd leg in the corner space of the next square), the DC in the corner space of the second square.
LikeLike
Hello I’ve been trying to find a pattern (for years now) like the Shawl Hattie McDaniel wore in Gone With the Wind movie. It has a combination of yarns into the same square rounds. The closest I found was your square in this tutorial where you combine different yarns. Do you have a pattern/tutorial for that? Thank you!
P.S. Also there is a ribbon like stitch running through the joins if you know how that is done m’be a SC stitch?
LikeLike
The squares in the Join as you Go tutorial are here: https://crochetagain.com/2014/01/07/log-cabin-granny-square/
LikeLike