

I have a weird obsession, um, I like things that are chickens, they amuse me and make me smile. I don’t know why. I also need something to keep me from burning my fingers when I cook. And so, I needed to make this chicken potholder. (I had to do it, I tell you!)

I made this potholder some time ago, and didn’t write down what I did. I thought it was simple enough that I would remember. I was wrong, I did not remember, at least not exactly. And black yarn is devilishly hard to see exactly what is what, so I thought it best to make it again to figure out what I did (excuse for another chicken!), this time writing it down as I went so I don’t have to go through this again.
what you need
Medium weight cotton yarn in black, white, red, yellow and turqoise or whatever color you want your flower to be. I used Bernat Handicrafter cotton, because I already have a bunch of that, all I needed to get was the black.
size F-5 (3.75 mm) crochet hook
These are brief directions, mostly just the notes I jotted down as I went, rather than complete, detailed, how to do each little bit like a real pattern : ) Please note a few things:
- When I say attach a new color, use a ch3 to make the first stitch, or attach with a standing stitch. This always counts as the first stitch
- All the dc’s are done in the space between clusters of dc’s unless I say otherwise : ) So attach your new color in the space between.
- Slpst to the top of the beginning ch3 or standing stitch at the end of each round
the body
Is worked in a circle, and later folded in half.
With black, make a sliding loop, or use your favorite method of crocheting in rounds.
rnd 1: (continue with black) ch3, 11dc in loop, slpst to top of ch3. Do not end off.
rnd 2: (again in black) ch3, dc in sp between the ch3 of the previous rnd and the first st. 2dc in next sp and each sp around. (remember to slpst to the top of the first stitch or ch3, here and evermore) End off.
rnd 3: Attach white (remember to do a ch3 or standing stitch, it counts as the first stitch here and forever). 3dc in ea space between clusters, around. End off.
rnd 4: Attach black. 3dc in first sp, 4dc in next. Repeat around, end off.
rnd 5: Attach white in the space to the right of any 3dc set, ch3 for the first stitch, 2dc in same sp (3dc in the next sp. 3dc between the 2nd and 3rd dc of the 4dc set, 3dc in the next sp) Repeat what is in between the ( ) around. End off.
rnd 6: Attach black to the right of any 3dc set that is in the center of a 4dc set from rnd 4. 3dc in same space. 4dc in the next sp, 3dc in the next. (4dc in next sp, 4dc in next sp, 3dc in next) repeat around.
rnd 7: Attach white to the right of any 3dc set. 2dc in same sp, (3dc in next space, 3dc in space between 2nd and 3rd dc of 4dc set, 3dc in next sp, 3dc in space between 2nd and 3rd dc of next 4dc set, 3dc in next sp) repeat around
rnd 8: rnd 8 Attach black in any sp, 2dc in same sp, (3dc in next), repeat around slpst to top of first st. do not end off
Weave in all your ends.
Fold in half, continueing with black, sc in each st in the back loops only of the front and back (the inner loops of the sts). Do not end off.
Slpst in between 2dc nearest the edge of the folded half (through both halves), ch 15, turn, slpst in same sp, ch20, slpst in same sp, ch25, slpst in same sp, ch20, slpst in same sp, ch15 slpst in same sp (tail made). Do not end off
Sc in 2nd sc, (skip a stitch, 5 dc in 2nd st, skip a stitch, slpst in 2nd) repeat around. Leaving 6 sts at the end. End off.
Phew! I hope I have all that completely correct and that it is written so it can be understood correctly too! (writing patterns is hard!)
now it becomes a chicken…
Attach red in same sp that you ended the black, with a slpst. Skip a st, 5dc in next st, sk a st, slpst in next, sc in next 2 sts. Sc into the top of the folded end, through the sp between dc of the front and back. (Ch5, dc) 7 times, ch5, sc. End off..
Attach yellow in the first red st (the slpst that ends the red 5dc shell), ch 1. Yo, pull up a loop, yo pull through 2 loops on hook. In next st, (yo, pull up a loop, yo, pull through 2 loops) 3 times, in the next st, yo and pull up a loop, yo and pull through 2 loops. Yo and pull through all loops on hook. Ch1, end off.
and prettify it a bit…
Large Flower
With red, make a sliding loop. Ch3 (counts as first st plus ch1), (hdc, ch1) 5 times. End off.
Attach blue with a slpst in any ch1 space, ch2, 3dc, ch2, slpst in same sp. In next ch1 sp (slpst, ch2, 3dc, ch2, slpst). Repeat in each ch1 space around, making 6 petals total. End off, weave in ends.
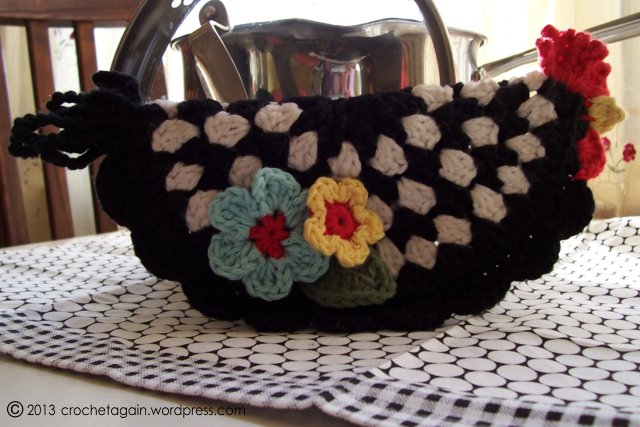
Here it is again, prettified with additional flowers I had laying around…although I think it is darn cute just by itself. It is on the small side, just right for me to use with my pot lids.

Adorable!
LikeLike
Love the whimsey!
LikeLike
Very cute! The flowers are the perfect touch!
🙂
LikeLike
really cute hen!
LikeLike
So for a beginner, could you point me to a pattern for the body? I feel like I can add the chicken parts from your guide, but I need more details for the beginning. Thanks!
LikeLike
The body pattern is my own, so there is no other to point to that is the same. You could probably use any granny round pattern and adapt it.
I am working on a diagram, don’t know if that will help (when it is done).
LikeLike
the pattern leaves me in the dark, even tho I have been crocheting awhile…I would love FULL instructions too!
LikeLike
I enjoy reading your blog and seeing your lovely projects. I’d like to share an award with you and hope you’ll hop over to my blog for details!
http://yarnknitreadlit.blogspot.com/2013/03/liebster-award.html
🙂
LikeLike
I love Ur site! And the pic of the snow and Ur dog was awesome! I love snow! Kinda glad its starting to get warm here in ne Ohio. But back to cold on the weekend. I laughed at dog hair opitional! My house too. I always say some of me is always crocheted into my projects, try as I might to keep my hair out of it! Thanks for the patterns. Shelley
LikeLike
Ssssooooo cute! I have lots of roosters in my kitchen, love this!!!!
LikeLike
I just finished the chicken and looks great in my kitchen with all my other roosters and such. I’m trying to figure out a way to make one that stands up on it’s own. Thanks for the pattern….
LikeLike
Pat, would you be willing to share the instructions for this chicken? Thanks!
LikeLike
I don’t know who Pat is, but these instructions are already being shared since they are on my public blog that anyone can read. : )
LikeLike
Hi! Thank you so much for sharing this! I’m new to crochet and have enjoyed the little odds and ends I’ve made so far. I’m hoping you can help me with a bit of the pattern, please and thank you:
Fold in half, continueing with black, sc in each st in the back loops only of the front and back (the inner loops of the sts). Do not end off.
I’m not sure where the front and back are. Should I sc in the back loops all the way around?
I’m very new to crochet and really appreciate your guidance (and patience)!
LikeLike
You are folding the circle so you have a half circle, and then crocheting the half circle closed. Sc stitches should line up with each other, so you can crochet the inner 2 loops (the back loop of front stitch, and the front loop of the back stitch.
LikeLike
Oooohhhhh….yeah, I got that wrong-lol
Thank you!! This is a fun, super cute project 🙂
LikeLike
This is the cutest idea! I’ve never made a potholder yet, but thank you for inspiration! It’s a neat way to spice up a kitchen and you can get so creative!!
LikeLike
Love it! Finished two and am working on a third. There aren’t many patterns for potholders that I like available out there for free or otherwise, so thanks for sharing.
LikeLike
Thanks! It is nice to know others like my chicken as much as I do!
LikeLike
I have 2 friends who are mad for chooks (Aussie “chickens” 😉 ) and I am going to have to make them at least one of these each…anyone for rainbow chooks? 😉
LikeLike
Love this as I too am chook mad. Will be doing this one asap.
LikeLike
I love you’re pattern so mu h I just made two! Thank you!
LikeLike
What does this mean? “(Ch5, dc) 7 times, ch5, sc. End off”. I’m to the part of the pattern where I’m making the comb on top of the chickens head. Do I chain 5 then do a double crochet where?
LikeLike
“Sc into the top of the folded end, through the sp between dc of the front and back. (Ch5, dc) 7 times, ch5, sc. End off..” All of that is done in the same space you sc into, so yes, you ch5, then dc into the same space the sc was in, ch5 again, dc again into the same sp, and so on.
LikeLike
THANK YOU!!!
LikeLike
thanks – been looking for that pattern ( or similar) My Mom has one she got at a craft fair so I wanted to make one but need pattern- still new at this crocheting thing!
LikeLike
What do you mean, awaiting moderation?
LikeLike
What’s up with the link you have, that isn’t working at the moment (removed)?
LikeLike
I just made this adorable chicken potholder. Like you, chickens just make me smile for some reason. Anyway, your directions were easy to follow and I am very please with the way my sweet potholder turned out.
LikeLike
Thank you! So glad others enjoy my chicken, I had fun making her.
LikeLike
Did the chicken potholder in read and light yellow. Came out spectacular. It is not identical since I did not understand the last rows, but so beautiful. Can’t wait to show on facebook. Thanks for sharing the pattern. God bless.
LikeLike
Everyone should love chickens, and your chicken is tops with me, Love the size, and colors. Thank you for sharing with us!
LikeLike
Forgot to mention that one special little chihuahua calls me mom,and dog hair is part of my life!
LikeLike
I just found this pattern and am crazy chicken lady who cannot wait to begin! Thanks for the free pattern.
LikeLike
Thanks for posting. I just turned a failed cherry pie potholder into a chicken one.
LikeLike
I adore your chicken pattern. It will match my chicken cookie jar. Its so tastefully made. Thx so much for the freebie.
LikeLike
A chicken cookie jar?? I don’t have one of those : ) I’ll be looking!
LikeLike
Hi there! Just finished up one of these wonderful little chicken yarn delights. I love the color combo you used too! I changed the flower to a slightly different blue and I had some challenges with various steps, and made up my own beak because I was confused, but I faked it til’ I made it work. Ha! Would you mind if I created these to sell in my shop or to a few possible customers? I have a very small biz base. I would of course acknowledge you as the tutorial designer. Thanks so much for sharing. Love this!
LikeLike
Sure, you can sell the ones you make!
LikeLike
I didn’t see the instructions for the tail feathers? Did I over look them?
LikeLike
it is there, the tailfeathers are made with ch sts, so there is a part after folding where it will say ch 20, (or so) slpst and so on…
LikeLike
maybe I am missing something – after row 8 – after folding in half – are the SCs done through both halves? Or is the piece still open in the center?
LikeLike
Yes, you do the sc’s through both halves to close it up. It is done through just one loop of each half, the inner ones that would be touching when folded (it does say so in the directions, but obviously not clearly enough!)
LikeLike
thanks!
LikeLike
Love this! Just one question: how did you get it to stay upright after it was finished?
LikeLike
In the photos, it is leaning against something. In the first one it is a glass jar, and the second it is the lid to the pot. It isn’t able to stand on its own.
LikeLike
Love your chicken.. I am having trouble with pattern starting with the scallop edge. Instructions say to work around leaving 6 stitches at end. .Do I crochet thru both sides? If so, does that leave enough opening to use as a mitt? And if I am working around flat, and it says to attach red where black ended, won’t that place the head at the tail? Sorry to be so dense but I I need help, maybe a few pics showing construction. Thank you for your patience
LikeLike
Yes, you crochet through both sides. There is no opening, it can not be used as a mitt. It is folded in half, so you don’t go around in a circle, you leave the flat edge without the scallops as in the photograph and as in the written directions.
LikeLike
I absolutely love this chook pot holder. My daughter and I love chooks. I am going to make cream and brown ones as we both love brown speckled chooks. You’ve really inspired me. Thanks.
LikeLiked by 1 person
love to see your pot holder when it is done, been thinking other colors would be fun!
LikeLike
I also have a chicken obsession – thank you for sharing your cute pattern
LikeLike
Can you please show me a picture of the last part of the pattern that was written?
I”m still a little confused. If I can see it then I might understand it.
Fold in half, continueing with black, sc in each st in the back loops only of the front and back (the inner loops of the sts). Do not end off.
Slpst in between 2dc nearest the edge of the folded half (through both halves), ch 15, turn, slpst in same sp, ch20, slpst in same sp, ch25, slpst in same sp, ch20, slpst in same sp, ch15 slpst in same sp (tail made). Do not end off
Sc in 2nd sc, (skip a stitch, 5 dc in 2nd st, skip a stitch, slpst in 2nd) repeat around. Leaving 6 sts at the end. End off.
LikeLike
I don’t have a pictures of just that. You fold it so you have a half circle, then sc along the curved edge to connect them together. The next paragraph is about making chain loops for the tail.
LikeLike
Okay, I think I got it. Thank you so very much.
LikeLiked by 1 person
Love this pattern. I am stuck with the comb and peak. Is there any way you could do a vedio tutorial on those?
LikeLike
I’m sorry, I am not good at videos.
LikeLike