
Well, I think it is better : ) As I said before, in my other Granny Rectangle post (I think this one is better), I have always been unsatisfied with how the center of granny rectangles line up in the middle, instead of alternating like it does in the rest of the fabric. It seems weaker and is not as pleasing to me, I just don’t like it : ) Don’t know why I didn’t do it this way the first time I got the idea, but at least I thought of it now.

A Better Granny Rectangle (or a variation) has been used to make:
Granny Rectangle Dog Mat (has a longer starting center)
Granny Rectangle Throw
Updates
2/9/17: I have a new post A Better Granny Rectangle Revisited. I have made some tweaks to how I do them since I first posted this and thought it deserved a new post. I include another version for doing them with 3dc, ch1.
1/17/17: I have added a Granny Rectangle V2.0 diagram (at the end of this article). This one has ch2 corners and ch1 in between the 3dc’s, to show that version of granny squares.
2/25/16: I have added another diagram that shows another round added so you can see how I continue on in the same color, it is near the end of the article.
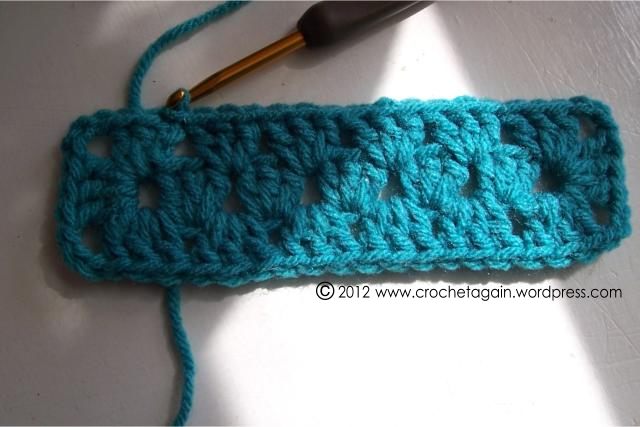
For the size I did in the example:
Ch 22 Ch 21 (corrected 8-24-13)
In the 6th chain from the hook, 3dc.
Skip 2 stitches, 3dc in same stitch.
Continue across, skipping 2 and doing 3dc in the same stitch. When you reach the last ch, 1dc. Ch3 (counts as a dc)

In the space on the end created by the dc and foundation ch; 2dc, ch3, 3dc, ch3, 3dc. 2 corners on the end made.

3dc in each space between across…

At the next end; in the ch 5 space 3dc, ch3, 3dc, ch3, 3dc to make the corners on the other end.

Now, go across the other side, making 3dc in each space between…

Slpst into the top of the beginning ch3 and there you have it!

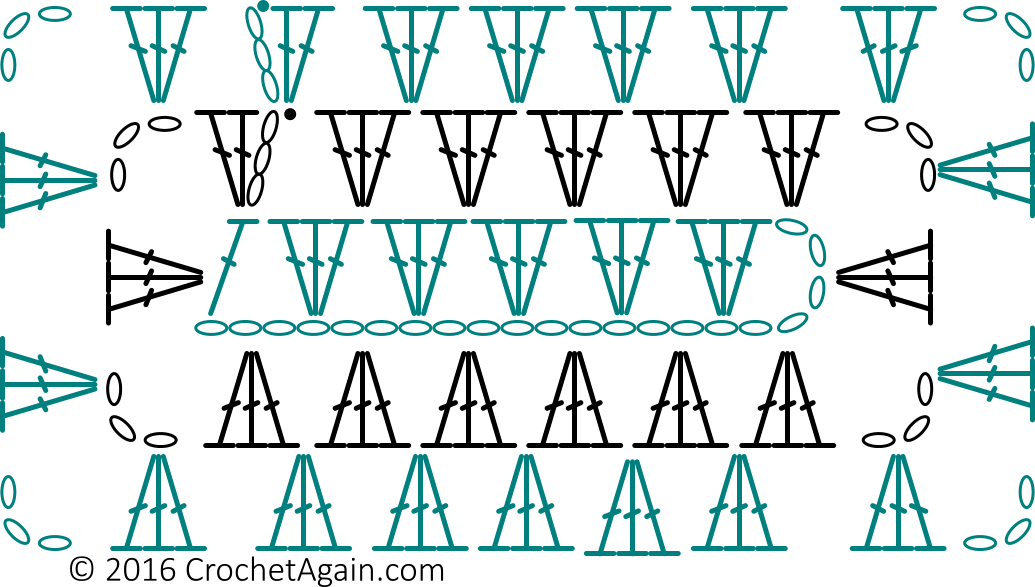
I find diagrams so helpful (pretend you don’t notice that I forgot the ending slpst in the diagram):

and another, to help with the maths of the repeats in case you want a different size…

Updated 2/25/16: Here is a diagram with another round of crochet added. To continue on, you would repeat as in the 2 rounds shown. Update: you can do ch2 in the corners if you find ch3’s are too much. Ch3 works fine for smaller projects, but ch2 would be better for larger items.
Update 1/17/17
This is A Better Granny Rectangle v2.0. The difference is ch2 on the corners and ch1 in between the 3dc’s. For those times you are using this to make a blanket and want to make your grannies with the ch1 between clusters. To change the size, adjust by 4 ch’s.
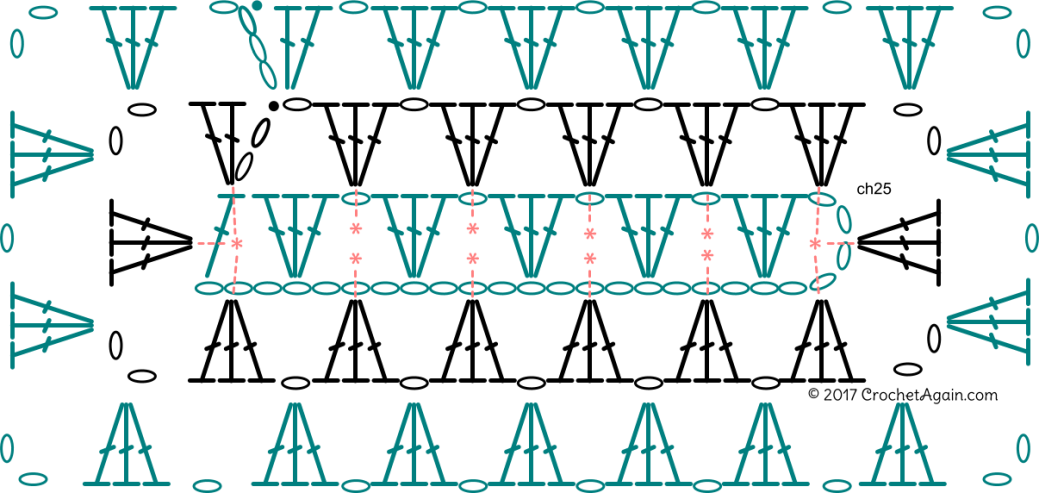
I am feeling that the added space in the starting chain in this 2.0 version is too much, not working as neat and tidy as I would like. Looks like this will be evolving even more, stay tuned!

Really nice and neat! Better than the solution I came up with. May I share this on my blog?
LikeLike
Sure! Just link back to my post on it.
LikeLike
Hi Sue , This was very helpful. After you slip stitch, do u chain any to continue with pathern. Thanks Deb
LikeLike
Yes, I would ch3 to equal a dc, and then continue with another round.
LikeLike
Thank you for sharing this; never did rectangle in all my years of crochet; this looks super easy :), even the diagram is clear;
LikeLike
Thank you so much. Very clear pattern that even I can read. Always wanted to make a rectangular blanket. It’s a project that I can take on holiday with me.
LikeLike
How do you do the black edge to connect to the next square which joins the rows. Do not see instructions for the joining.
LikeLike
I am not sure what you mean. This doesn’t have a black edge, and it is only one rectangle. Maybe you meant your comment to be somewhere else?
LikeLike
How do you do the black edge to connect to the next square which joins the rows. Do not see instructions for the joining.
LikeLike
Thank You so much! I surely will!!
LikeLike
oh I love working with a diagram, so clear. xx
LikeLiked by 1 person
thank you so much for the tutorials! I love the dog, you can’t find a better dog than a Border Collie and Zip is a perfect one. Lizzy
LikeLike
gracias!!!super claras las fotos
LikeLike
Nice! I’ve been looking for a rectangle one. I saw a tutorial for makin ‘yarn’ from plastic bags and I want to make a recycle bag for paper with it. With this pattern I will be able to do it. Thanks!
LikeLike
I’ve thought of make plarn too, would make nice grocery bags. But the time to make the yarn on top of doing the crochet has kept me from starting..
LikeLike
Here is a video of making one long piece of yarn. Fast and easy. http://www.youtube.com/watch?v=q4gJSR4RtDw&feature=youtube_gdata_player
LikeLike
Thank you for sharing that video, that is very easy! I think I will go put that in a post to share with everyone.
LikeLike
This is great! I just tried it! I will use it when making purses! Thank you!!!
LikeLike
Making a bag is exactly why I worked it out, didn’t like the foundation chain showing. Not pretty, and seemed a weak spot. I didn’t think of it until much later, too late for that bag!
LikeLiked by 1 person
this is so helpful. you do the great job. i really like your blog.
LikeLike
Thank you taking the time to lay out this variation. It’s more appealing than the alternative pattern. My question is, to continue the pattern, would a ch 3 be needed in the corners rather than ch 2 as in traditional granny squares?
LikeLiked by 1 person
I always do ch3 in the corners of any granny square, that works out for me. You could do with ch2 and see if you like how it works out.
LikeLike
I’m doing the ch 3, and my corners are puckering up like there’s too many stitches there vs my sides. Any way to prevent?
LikeLike
Do a ch2 instead, the number of ch’s on the corners isn’t crucial. I always felt I needed the ch3 to have room for all the stitches in the corners, but if I do my chains looser then ch2 works as well. Unless I am not understanding the difficulty you are having correctly.
LikeLike
Thanks, Just what I was looking for and you made it so easy !
LikeLike
Wow! Thanks for this great way to do a long granny square! I used this to make a long granny square scarf and it looks great! It’s my new way to start a rectangle granny square afghan!
LikeLike
Thank you so much. This is brilliant! Thanks for sharing your gifts and talents.
LikeLike
I love this stitch! Thank you so much for sharing. I have a request thou. I would love to make my son a blanket for bed using this stitch , but i have a problem. I am not quite sure how to figure it out if you could help me it would be great, just the starting part is all i need. It is like 240 stitches to get started just all i need is the first stitch to start and the turn stitch if you can help…thanks.
LikeLike
I am not sure I know what you mean, I think I would need the pattern to see what I would try to change it to do this way instead….if it is a granny stitch, I would want to have the same number of 3dc’s across as the pattern calls for (usually it is 3dc’s in one chain, sk 2, so you need 3 ch’s for each set of dc)
LikeLike
I LOVE IT! Every other pattern I have found tells you to “work along the other side of the chain”. I can never figure out how to do that. Thank You!
LikeLike
Fantastic tutorial and a diagram! I love diagrams! Thank you so much!
LikeLike
Thanks for the help with this pattern! I made one:
http://estreachikitu.blogspot.nl/2013/03/granny-rectangle.html
(of course linked up to this page:-)
LikeLike
Such a beautiful blanket! Thanks so much for sharing it, it gives me joy (and inspiration) to see that people have made something from my pattern.
LikeLike
This is brilliant – thank you very much for sharing. 🙂
LikeLike
I like the look of this version of your granny rectangle. Like you I don’t really like the looks of some granny rectangles. I was just wondering if you have the crochet multiples for this granny rectangle so I can make it longer.
LikeLike
The diagram makes it easy to count out to change the size.
LikeLike
Thank you so much for this. I have been looking to see how to tackle a rectangle. You have made it so simple. The pictures are a great help. Thank you.
LikeLike
This is the BEST better rectangle granny instructions that I have found & its EASY to follow. Very nicely written. SUPER EASY to follow. Job well done.
LikeLike
The pattern is great but I didn’t know how to increase the pattern. I would like to see a project or a longer pattern because mine is not turning out so well. My friend, who is also a fellow crochter, thought to add an extra shell for the increasing of the pattern.
LikeLike
Yes, that is how I would make a longer rectangle!
LikeLike
Where do you go from here to start another row and continue? I’m still learning and am not sure what to do next. Chain 3 then start working in the corner?
LikeLike
Yes, you got it!
LikeLike
I love your idea of rectangle afghan because it is not baggy like others it really show stitches looks neat. Thank you for sharing your idea.
LikeLike
I love this pattern and have made several, posted on Ravelry at jruss95. Thank you for sharing!
The one thing I would suggest for your consideration is to add the word TURN (or even TURN YOUR WORK) to the instructions at the end of the first row, after the ch 3. Your photos show this, but it might help beginners to understand exactly what to do next.
LikeLiked by 1 person
Thanks for the tip!
LikeLike
Very easy and I like the multiples (I am assuming it is in muliples of three plus 1, that is how I am reading it).
The only thing I did change was to ch 1 in the corners (I do that with regular granny squares also, like the tighter look better) rrather than ch 3 or ch 2.
My next idea is to see how to connect them (if I do just a few rounds) with the join as you go method that I use for regular squares. Would be cool to see what happens.
Thanks for sharing.
LikeLiked by 1 person
I am just finishing my first blanket with this pattern. I am so pleased with the results!! It was fast and easy and I will be making several more.
LikeLike
Thank you so much for this fabulous tutorial. I’m going to give it a try this weekend! I featured it today on my Weekly Inspiration post on my blog:
http://www.sewcreativeblog.com/weekly-inspiration-diy-projects-for-the-long-weekend/
Best Wishes,
Crystal
LikeLike
If I’m making a shawl 5 feet long, how do I know how many chains I need to start with??
LikeLike
I think you will have to make a test strip to sort that out. There are too many variables, yarn weight, hook size, how you crochet, if you want it closer to square or longer that will all effect the start.
LikeLike
Is there a way I can just print out your directions??
LikeLike
I added a print icon at the end of each post, so that should make it easy to print the blog post. I prefer not to print out everything on a web page, so I usually highlight the text I want, right click and choose print and then to print just the ‘selection’ instead (your computer/browser may vary : )
LikeLike
Thanks so much!!!
LikeLike
Please advise how I make a giant granny rectangle blanket? Your instructions end with a slip stich into the beginning chain 3, but how do I continue with the same color if I’m not breaking off the yarn at that point? And if I’m changing colors, do I break it off and, if so, how and where do I pick it up again with the new color?
Sorry for the newbie question!
LikeLike
If you are continueing with the same color, do the slpst at the end of the round, but don’t break off. Ch3, which counts as the first dc and continue on. If you are changing colors, yes you break it off. You attach your new color in any ‘space’ that you would do the 3dc in.
LikeLike
Many thanks, Sue. Great pattern, love how it looks as it grows!
LikeLike
Bonjour, je débute au crochet et j’ai tt compris…je suis aussi nulle en angalis mais je vous fait une traduction. et Merci pour ce tuto.
Hello, I started to crochet and I undestand everything…. My english is bad too but I try to do a translation. Thank you for your tutorial…. I’m so happy.
Stéphanie from France
LikeLike
I love this! I’m going to have to rip out what I’ve done so far and start over, because my ultimate goal is always a rectangle, and I don’t like expanding on the ends. This is great! Thank you!
LikeLike
I’m having quite the issue. For some reason I end up with 4 stitches at the end instead of 3 when I follow your pattern. It’s a 3+1 pattern, so I do 22 chains and 3 dc in every 3rd chain. But I still end up with 4 chains at the end. Am I missing something?
LikeLike
Are you counting your slip knot at the beginning as a chain?
LikeLike
I am not. I start by skipping 5 chains and crocheting into the 6th chain from the hook. For some reason I cannot seem to figure this out! It’s very frustrating because I would very much love to utilize this to make a baby blanket. Could you potentially upload a few more pictures of your starting chain indicating where you start and end?
LikeLike
There is nothing wrong with you, you are right! You will have an extra if you ch22 like I have in the written directions, it is a typo!!!!!. If you count the stitches in the diagram and in the photo you will only count 21!
Thanks for being persistent and asking, I never would have seen the typo otherwise! It is being corrected right now….
LikeLike
Phew! Eventually I followed the diagram and got it correct! Thanks for helping and being so patient and kind!
LikeLike
I have to admit that my chain count never turns out correctly, either.
But I always chain extras anyway, provisionally, for all projects and then unravel back to where I need to be at the end of the project!
LikeLike
I have a feeling trouble counting is more widespread than we would think! I’ve taken to always re-counting the chains before I start. With longer starting chains, I have been putting in stitch markers and jotting it down as I go.
It is also very easy to miss chains when you are doing 3 stitches in one, they get squished in.
LikeLiked by 1 person
Excellent tutorial, cheers for sharing and in our house, dog hair is obligatory! 😉
LikeLike
Does the beginning chain length work for any size afghan? I want to make a baby blanket and a queen size and wasn’t sure if I have to adjust the chain length. Great tutorial, thanks a lot!
LikeLike
I don’t know, I haven’t made different size blankets with it.
LikeLike
I am new and not sure I understand. Do you follow this pattern for the whole blanket. When doing a square, the pattern has you chain 2 for corners and chain 1 on sides in between your 3 dc.
LikeLike
Some people do just that, and make a blanket of one large rectangle.
There are different ways to crochet granny squares. I do mine without a ch1 on the sides and ch3 for the corners. You can change things if you prefer to do them a different way.
LikeLike
I recently got back into crocheting after a 10+ year break. I tried rectangles back then and did care for the look in the center. I somehow found your blog and will try this method for my next project after I finish my ripple afghan. I am thinking of doing multiples and piecing them together. Thank you for the easy to follow directions.
LikeLike
Hey njoyed every bit of making it…. A BIG THANK YOU….. u r real cool and a very detailed teacher……… i loved it the way it turned out to be…. take care….. god bless u………..
LikeLike
Thanks so much for the diagram. Makes the pattern much easier to do. I’ve got it. Finally, I’ve got it. Hugs.
LikeLike
Thank you! ❤
LikeLike
When doing this pattern with more than one color does it turn out square? I have done Granny blankets before but they always look lopsided when finished if using multiple colors.
LikeLike
If you mean 90 degree corners rather than square (since it is supposed to be a rectangle : ), it comes out fine for me. You might need to experiment with your corners and maybe your hook size. You can see some larger (multi-colored) projects others have made with this on Ravelry (there is a link at the top of this page, the little image that says how many projects), you need to be signed in to Ravelry to view them (if you are not a member, it is free to join).
LikeLike
At working to the end of the tutorial size, how would I keeping going? I know I would need to skip the last slip stitch. I will be working to approx 18″ rectangle to be used as a prop mat for newborn photography.
LikeLike
You continue on like you would for any Granny Square. You do slpst to the top of the first chain (to connect the end of the round), then you ch3 for the first stitch of the next round. (or, if using a new color, you would end off and then attach the new color)
LikeLike
Thanks for sharing this! I was about to work on a plain rectangle to fill a space in a freeform garment and I found your lovely design. Deeply appreciated and happily applied!
LikeLike
Cant i just keep on going and make a blanket out of this…
LikeLike
Yes, you can! If you click on the r projects button at the top of the post it will take you to the Ravelry projects page where many people have done just that.
LikeLike
Great tutorial! I’m using this pattern for two blankets, and was writing about it on my new blog! I did link right back to here, though!
http://artscraftsandkids.blogspot.com/2014/05/joining-different-sized-granny-shapes.html
LikeLike
Very nice, looking forward to seeing how your adding in smaller squares turns out. I love the looks of combining different sizes.
LikeLike
Reblogged this on kerraboo2.
LikeLike
working on one now with multicolored yarns will post when i get more on
LikeLike
Thank you SO much for this tutorial. I’ve looking high and low for a rectangle granny stitch afghan to make for Crochet for Cancer. This should be perfect.
Any suggestions on a type of yarn to use?
LikeLiked by 1 person
Should work with pretty much any yarn you would use for a blanket.
LikeLike
Thanks so much for this pattern! I’ve been looking for a long time for a decent granny rectangle pattern. I am making this in golden Homespun yarn to match the gold coloured stripe in my plaid sofa. It sounds tacky, but I think it will actually be quite nice.
LikeLike
I don’t think I sounds tacky, the right color would look lovely. I have a thin gold thread in my sofa material, so I can see choosing gold. Hope the rectangle works for you!
LikeLike
I agree, love this method…Thanks for Sharing!
LikeLike
This pattern is just what I was looking for, I am going to try it on the next blanket I make. THANKS so much for the pattern.
LikeLike
This is wonderful, you are very clever, the possibilities are endless. Thank you so much for sharing.
LikeLike
I really like this. I have always done the traditional granny square, but this will now give me another option.
LikeLike
I am new at this and wonder what do I do to continue once I get to the last corner .
LikeLike
after you slpst to the top of the ch3 to end that round, if you are changing colors you would end off and then attach a new color in any space between 3dc’s with a standing stitch or a slpst ch3, or if you are keeping on in the same color, you would ch3 and then 3dc, ch3, 3dc in the first corner sp and do the same in next corner sp, 3dc in between ea 3dc cluster until you reach the next corner, and continue as you did the first corners.
LikeLike
Thank you so much Sue, your a big help.
LikeLike
I just found this and THANK YOU!!! I make granny square blankets for friends when their new babies arrive (I am lucky to have very fertile friends!), but I always do squares. My son just recently (he’s 5) asked me why I hadn’t made one for him, since I made one for his sister (I wasn’t crocheting when he was born). He has a double bed, so I’ve been trying to figure out how to make my typical pattern into a rectangle, but without having the extras – or having it look like it was added on. I want to give it to him as part of his birthday present – this just made my day!
LikeLike
I just wanted to say thank you for posting this. I am thrilled with how my project is coming along. I also want to thank you for posting this with pictures as well as written, I learn somewhere in between the two. My progress so far is here: http://imgur.com/gallery/9RBVw/new
LikeLike
Great pattern! Just one question, do you chain one after the three double crochets ( step three)?
LikeLike
No, I don’t chain 1 in between the 3 dc’s. I know other people do that, so if it works out better for you, go ahead and chain 1 : )
LikeLike
Ok thanks :D. Another question (sorry), if you dont do 1 chain, does it curl up a bit as it get bigger?
LikeLike
Any curling disappears for me when the border is put on. If not doing a border, then could be a concern.
LikeLike
Ok. But I am a beginner so what do you mean by ‘Border’?
LikeLike
An edging, a different decorative stitch or combination of stitches that goes all around the outside edge (could be several times around for the full effect).
LikeLike
i love the rectangular granny squares but more corners seem to be higher than the sides of the blanket. does this even out as the blanket get bigger from the weight
LikeLike
I haven’t made a large item myself, so can’t say if it will work out for you or not. There are larger projects made at Ravelry that good, but I don’t know if they had trouble with their corners being higher.
LikeLike
How do you determine the length of Middle bit?
LikeLike
I love this look! Any way you could make a video?
LikeLike
I need help with the next row after the tutorial diagram. Can someone post a picture? I can’t get past the written comments to questions. xo
LikeLike
What is causing you trouble?
LikeLike
Hi 🙂 I don’t know how to continue on past the tutorial last row. I need a visual on how to carry on. I am unable to follow the answers to others’ questions. xo
LikeLike
What size of hook do I use and can you tell me how many actual legth of chain do I need to make some slippers ty
LikeLike
That would depend on different things, I would have to try to make slippers to figure it out, which I haven’t done.
LikeLike
Thank you for the clear directions! For years, I’ve been hanging onto a yarn I love, Herrschners Holiday yarn, but couldn’t figure out how to make an afghan with it. It’s very slippery, and didn’t look right in the granny squares I’ve made before. Also, the thought of putting those slippery squares together was daunting. Now, I’m happily on the fourth round of your rectangular design. Not using a chain stitch between the three double crochet stitches is making it dense enough to handle this yarn and be warm, but still have a bit of a lacy look, too. By Christmas, I’ll have a great gift for my husband!
LikeLiked by 1 person
Love the pattern made a bookmark with it.
LikeLike
Didn’t think of it working for a bookmark – nice!
LikeLike
What size hook did you use for this?
LikeLike
You would use the size appropriate for the yarn you were using. I think I would have been using an H hook for this yarn in the sample.
LikeLike
This is just what I was looking for, thankyou!!
LikeLike
Hi! I loved your pattern but I have one question, what size will it be if I do the one you did? I’m trying to crochet a blanket but I’m a little lost about the size.
LikeLike
If you do it as in the directions, it worked out to be about 5 – 6 inches longer than wide (same as the Granny Rectangle Throw here: https://crochetagain.com/2015/10/18/granny-rectangle-throw/). How big you it ends up is determined by how many rounds you do, but the proportions would remain the same. If you want longer proportions you can change the beginning, another example with different proportions is here: https://crochetagain.com/2015/11/06/granny-rectangle-dog-mat/. You could use that start and just keep on with more rounds until it is a size you like.
LikeLike
I made it a tiny bit longer and then added a chain with single crochet and then a loop to make a headband
LikeLike
I am so happy you did this tutorial! I also do not like the conventional start with the ring, I have been desperately wanting to make a rectangle blanket! These steps are so clear and really easy to follow and I am already a couple rounds in on my dream blanket! Thank you so much!!!
LikeLiked by 1 person
Same here! Thanks so much for this post!
LikeLike
I have ended where the tutorial ends. I now have a turning chain on top of the last st of a set of three. Since this is not the place that would have a stitch in the pattern, how do I get to a space to continue the work?
LikeLike
Not certain what you mean, as the tutorial ends with a slpst to the top of the beginning ch. To continue with another round in the same color, I would ch3 and then 3dc, ch3, 3dc in the ch3 corner space and continue around. Then as you reach the space just before the beginning ch3, you 2dc in that space and slpst to the top of the beginning ch3. The next round, ch3, 2dc in the sp, 3dc in the next and continue around.
LikeLike
I mean that all of the stitches are worked in spaces but your turning chain is worked on the top of a st. I would love it if you would work one more row and let us see what it looks like. Love your site and charts are great.
LikeLike
I get what you mean, I have added another diagram. I hope that clears it up!
LikeLike
OK. Sue. Thank you.
Sent from my Samsung Galaxy Tab®4
LikeLike
Hi Sue! I love this idea! I hate making individual squares that need to be sewn together so I would love to make this as one giant granny rectangle. Is there some type of mathematical formula to figure out how many chains I would need to start with? My cousin would like me to make one for her king sized bed and I have no clue how large to make the beginning. Thanks so much.
LikeLike
I haven’t worked out how many chains for different sizes. The proportions stay the same, so if your starting rectangle is 10″ longer than wide, then your ending will also be 10″ longer than wide. You adjust the size of the beginning ch by multiples of 3.
LikeLike
This is awesome thank you…I am also looking at how to calculate starting rectangle for different projects?
LikeLike
I haven’t worked out exact sizes. In general, the proportions remain the same, so if your beginning rectangle is 5 inches longer than wide, it will remain approximately those proportions as it grows.
LikeLike
Thank you so much for posting this. I have been looking everywhere for a pattern for a rectangle Granny Square and now I finally have one that I can understand!
LikeLiked by 1 person
While this is definitely easy to follow, I have to admit I really like the look of your original granny rectangle. I’m going to save both posts to make sure I have both options. ^^
LikeLike
This is just what I’ve been looking for. Do you have any approximate measurements of the ratio of length to width?
LikeLike
I haven’t done too many different proportions. There is a link at the top of the post to a mat I made, that has a longer start. So far it seems to remain the same as the example — so if it is 3 inches longer than wide, the finished project ends up the same.
LikeLike
Hi Sue. I am fairly new at crocheting. I am practising the beginning of the Granny Rectangle Throw. My question is after you do the foundation and round 1 and round 2, to continue on wouldn’t you just do round 2 over and over again. The pattern says to repeat rounds one and two? I keep looking at the tutorial one and I also printed the new version of just the instruction one.
Also both instructions read different when you get to the end of the foundation row and ready to start round 1. When you state “in the space on the end created by the dc and foundation” (tutorial one) or “in the space between the dc and 3dc of the foundation” (instruction only one) do you mean that space between the dc and 3dc or last space of whatever is there? Hope this makes sense.
Thanks.
Marcia
LikeLike
The way I do my granny squares (or rectangles), there are 2 slightly different beginnings. If you aren’t changing colors and just continuing, in one round I slpst, ch 3 and then would skip the 3dc that are right there and instead crochet in the “space” between the 3 dc I just skipped and the next one. The second way, I would ch3 and then do 2dc in the “space” I am already right next to.
If I change colors each round, then I end off and attach the yarn right where I want to start, so that doesn’t apply then.
I think if you look at the photos and diagram it might help make that clearer (I hope).
LikeLike
I’m a bit confused andI have done what the diagram shows but after round 2 do I complete round 1 and round 2 over and over again or just keep doing what round 2 says over and over again.
LikeLike
If you are using 1 color and continuing, you do round 1 and 2. If you are changing colors each round, then just round 2.
LikeLike
What I would like to do is crochet the center with about four rows of the same color and then do two rows of each color after that. But it is the beginning of row one and two instructions that I can’t seem to compute where it says first stitch of round and last stitch of round. Also when I slip stitch to top of chain 3 it doesn’t look right to me. I have ripped it out so ma many times. Not sure what my problem is ☺
LikeLike
It may be that when you attach your new color, that your round starts differently than mine did, as my example is in one color. If you attach your yarn, ch3 and then do 2dc in the same space, that would be like my round 2 (the last round in the larger diagram above). Soooo, probably would then do the next round as the rnd 1 (second to last in rnd in the diagram). Hard to know if what I am thinking is what is happening : )
LikeLike
I love love this!!!
LikeLiked by 1 person
Just left a link for this on my blog – great pattern, thanks!
https://iamsimplyhooked.wordpress.com/2017/01/13/granny-rectangle-blanket/
LikeLike
Making a backpack purse and needed a rectangular bottom. I didn’t like just two squares thrown together and sewn. This works way better and am using your pattern. Very easy and great diagrams. On a side note do you have any idea how to make a granny stitch half circle? (For the flap) Google is not helping. Thank you for the pattern and I hope someone can help.
LikeLike
Hi
Thank you for the granny rectangle pattern! I have used it quite a lot…made a Granny on the ridge with it as a base and I am currently using it as a start for a Virus meets Granny throw. I have shared your pattern using the URL for the page in my explanation of how I made the throw.
Hope you have a great day!
LikeLike
Hi! I just made your granny rectangle, needed it to make a basket for my daughter’s play stroller. I followed your directions, except, turned each row and went back the opposite direction and added a chain 1 just in between the double crochets on the short sides. Came out perfect! Thanks for the pattern!
LikeLike
Just a thought, would it be an even neater start to do one treble in each chain (instead of three and then skipping two chains), and then they’d only be defined into groups of three when you worked round two. Would make the two edges of that start row look more alike?
LikeLike
That is a possibility. I tried that once, and didn’t care for it at the time. Worth trying again as it might be just the thing for a different project.
LikeLike
Thank you thank you thank you!! I used to make rectangle grannies but the pattern I used wasn’t the greatest. That thin strip of stitches smack in the middle bothered me. Your pattern is genius!! It’s all filled in!! I’m already on my second baby blanket with this pattern!!! Thanjs again!
LikeLike
This is such a great pattern! I did make it a bit longer and have made two prayer shawls with it so far. The gals in my group love it as well, so I’ve shared this pattern with them, too! Thank you so much for this fabulous tutorial 🙂
LikeLike
Hi
This is a beautiful blanket. Thank you so much for sharing it <3. I would love to make one. How did you crochet the bits together (with the black)?
LikeLike
How do you join the rectangles?
LikeLike
There are many ways to join motifs. My favorite is join as you go. I have directions for that on the site (search should bring it up).
LikeLike
Just found your tutorial here via Pinterest. (Although I got the post before the improvements.) Thank you so much for such clear instructions and all the diagrams/photos. I looked at other tutorials, but they didn’t make sense to me. Yours did!! Thank you.
LikeLiked by 1 person
Do you “turn” your work after you connect the row with the slip stitch?
LikeLike
No. I keep going around in the same direction. There is a right side and a wrong side.
LikeLike
Please help with the math. I would like the finished rectangle to be 7″ x 9″ for a Warm Up America blanket piece. Thanks!
LikeLike
There are too many variables for me to say exactly what to do to get that size. Depends on the yarn, hook and each person’s tension while crocheting.
LikeLike
mine keep buckling (turning in on itself) have you any tips thank you
LikeLike
Not sure what you mean by “buckling”. Mine tend to have a little bit of curling at the corners, which isn’t a problem once the border is added. As long as it is just a little bit, it is nice and flat after I add a border. If it is ruffling, or a lot of curl then something has gone off.
LikeLike
I didnt see anywhere where you listed the hook size you used!
LikeLike
The hook size doesn’t matter, this isn’t an entire project.
LikeLike
You say “at the other end, in the Ch 5 space 3 DC…. etc”
But I don’t see anywhere in the instructions where you are told to change by so where is the ch 5 coming from? I just discovered your tutorial last night and I can’t figure this out
LikeLike
The chain 5 sp is what is left when you dc in the 6th ch from the hook, you made it in the beginning.
LikeLike
Thanks so much for sharing this pattern
LikeLike
Hello there! Thank you for the patten! I did modify it a bit because I agree with you about space left with the starting space. So I modified it by chaining 19 and using hdc instead of dc. I also only ch2 for the corners and starting the new rows. I hope this might help someone else as well ❤️
LikeLiked by 1 person