

Update
Please see my newer post A Better Granny Rectangle. It’s a different way of starting a rectangle, and obviously I think it is better, depending on what you want : )
I have been unsatisfied with how I was doing granny rectangles. I didn’t like how the center start didn’t match the rest of the fabric, where the clusters align instead of alternating and the starting chain is obvious. I thought of a different approach, I think I like how it turned out. This is my first tutorial, I hope it makes sense. if something isn’t clear please leave a comment and I’ll see if I can make it make sense : )
To Start
Make a sliding ring. Draw up a loop and ch 6(counts as dc, ch3), 3dc, ch3, dc in the ring.

Tighten up the ring and chain 3.
Rows
Turn, and work as a row on the bottom side with 2dc in the first ch space and 3dc in the next ch3 space. Ch3 and turn.

Make 3dc in the space between the 2 groups of 3dc of the previous row, and 1dc in the top of the ch3 of the previous row. Ch 3 and turn.

Continue working as rows, alternating with ch3, 3dc in next space, dc in the top of the ch3 of the previous row for 1 row and ch3, 2dc in the ch space, 3dc in the next ch space for the next row. Make however many rows you want, but you want to end with a row that has a center 3dc and a ch3/dc at each end.

I am going to change colors, so I am ending with a ch3 instead of a dc. That gives a consistent ch3 for each “corner” of my rectangle. If I was going to keep on with the same color, I would just do a dc, ch 3 for the round instead.

Slip stitch to the top of the ch3 of the previous row. End off. You now have a narrow rectangle of rows, with corner spaces.

Rounds
Attach a new color in a corner space with a dc (or slpst, ch3). 2dc, ch3, 3dc.

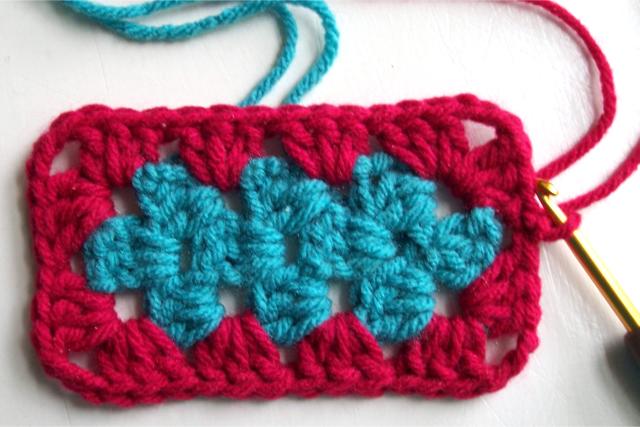
Continue around, doing 3dc along the side in the space between the 3dc’s of the rows and 3dc, ch3, 3dc in each corner space.

And there you have it, a crocheted granny rectangle.


Love This !! thank you for sharing
LikeLike
This is gorgeous Sue!!
I just wanted to let you know I Found your tutorial to be very clear and easy to follow, the only mistake I noticed is at the begining the round it say (2dc 3ch 2dc). Your granny rectangle is absolutely gorgeous I love it…Thanks again for sharing :o)
LikeLike
Thanks Lynne for your nice comment. I fixed the mistake, it now says 2dc, ch3, 3dc like it should.
LikeLike
Thank you! This pattern is very clear. I’m French and I love this granny!
LikeLike
nice tutorial about a rectangle granny! merci beaucoup for the sharing!
FleurBelge
LikeLike
Tx, nice change from the normal granny!
LikeLike
pls email this grannysruare to me
LikeLike
thanks for this pattern:)
LikeLike
Hi ~ at the top of the page, you said you had created a new version of the granny rectangle that you liked better than the one described on this page. Could you possibly email me that one? I’m going to try the one above now…..
Thanks!! Betsy
LikeLike
The text at the top of the page links to the post explaining it.
LikeLike
this is great. I need to turn my work to keep it straight ( finially found this out ended crooked center or leaning centers) would you do this the same? I have to start in corner with one shell and finish in that corner with the other shell chain 3 and turn
LikeLike
delighted with your tutorial. love the patterns.great to do something different.
thanks for all the trouble you have gone too. Ann.
LikeLike
Thank You So Much I Really Love How This Looks!
LikeLike
I actually like the look of this much more than the “improved” version
LikeLike
Just got this email and have no idea how to get to the new post about the foundation chain (?)
Thanks,
Betsy Oliver
LikeLike
At the top of the post, the words “A Better Granny Rectangle” links to the new post, it is not about a foundation chain, but a different way of starting a rectangle (which uses a chain to start it).
LikeLike
I love your artistic Better Granny Rectangle which I want to learn how to crochet this. I love your artistic Granny. I’m new subscriber of Crochet Again. Thank You, wonderful instructions! Smile, Donna K.
LikeLike
Made a Granny Rectangle before, but can’t find the pattern I used. I like your version much, much better! Great pics which really helps me “see” how it should look before I get too far gone on the wrong track. Thanks for sharing!
LikeLike
If it’s no trouble, I was wondering if you could post a diagram of this granny rectangle. I saw your other granny rectangle and loved the diagram for it, but I also really love this granny rectangle. It would be easier for me to see a diagram of it. If you have time that would be great. Thank you
LikeLike
How do you make a sliding ring. Like this beginning much better but I don’t know how to do a sliding ring
LikeLike
The directions for a sliding ring are here: https://crochetagain.com/2013/08/14/sliding-ring-in-photos/
LikeLike
I do like your other pattern as well but this suits me just fine as I plan to use it in a mile a minute type application. Thanks for sharing.
LikeLike
Do you have a video for this granny square?
LikeLike
Sorry, I don’t make videos.
LikeLike
Can this be made any length you want. Maybe even longer ones stitched together on long sides?
LikeLike
Yes, you could make it longer.
LikeLike